Nowadays, online businesses need reliable software to manage their events. This has become an essential tool to sell tickets and promote upcoming events. But we cannot separate such a process from e-commerce resources. This sector has revolutionized the global industry, significantly making purchases easier.
So, why not use an events calendar plugin that allows you to sell tickets with one click?
WooCommerce is one of the best options out there. This WordPress calendar plugin is also a powerful selling tool. It offers a free version. It’s well-documented and compatible with many extensions. Another plus is that it has a wide community of users.
If you find this interesting, take a look at the following guide and find out how to set up a WooCommerce events calendar.
Why Do You Need a WooCommerce Events Calendar?
For a company that sells products and promotes related events, WooCommerce is a brilliant solution.
Through your website, you can display events and grow the right client database for them. Both recurring clients and new users can see your community events, browse your calendar views, filter events, and enjoy additional features.
What Types of Events Can I Promote?
With your WooCommerce events calendar, you can display all your events, no matter the type. Here are some examples:
- Live in-person events: live music, concerts, comedy, charity, conferences, performances, dating events, and meet-ups
- Virtual events: life coaching, streaming, webinars, online conferences, etc
- Other events: boot camps, crash courses, test preparation, interview training, training courses, classes, and webinars
Setting Up Your WooCommerce Events Calendar Plugin
Somewhere along the way, you may need to sell tickets through your WordPress calendar plugin. This is where your website becomes crucial.
Hence, it’s time for you to get reliable software to manage your events. With the Amelia events calendar plugin, for example, you get an all-in-one solution. Organizers can set up classes, conferences, seminars, tours, and other activities. Also, they can set up recurring events, costs, duration, and other details.
Managing all this manually is almost impossible. This is where the integration of Amelia and WooCommerce becomes a lifesaver. This powerful combo will help you manage attendance, establish prices, collect payments, and control bookings.
How to Manage All Your Events
Creating your first event is easy. First, go to the “event” page and click on the “+” symbol to add a new entry. You’ll see many options:
Details
This is the first tab you’ll see and it has many fields:
- Name of your event.
- Date and time. Here, you can set up the date and the duration. For example, September 15th from 9 am to 5 pm.
- Recurring events. You can create a single event or a recurring one. If you want to choose the latter, choose “This is a recurring event”. Now, you can select how often and until when you will hold said When it comes to booking, you have the following alternatives: “booking closes when the event starts” and “booking opens immediately”. Simply put, you choose if visitors can buy as soon as you create the event or from a specific date.
Pay special attention to the option “apply this to all recurring events”. If you choose this, the same booking conditions will apply to all recurring events, e.g., the booking will start X days before the start. - Maximum capacity. Set up the maximum seats available. When the event is fully booked it will automatically change to “closed”.
- With the option “” allow more participants, visitors will be able to add more people to their bookings.
- Allow customers to book more than once. This option is also available for organizers.
- When you enter your event address, it will appear on the event list. There’s a “location page” where you can enter your addresses and reuse them when needed. The possibility to add a custom address is a big plus as it helps event organizers save time.
- Choose the proper tags for all your events. With this tool, users will be able to filter out events and find what they’re looking for faster. However, tags are not mandatory. You can choose not to add them but, if you do, they will appear on the event list. Experts recommend this option for organizers holding events of different types.
- Make all the basic information available for the user. Include notes, schedules, and important details. The event description will also appear on the event list. Click on the “translate” checkbox and make the details available in different languages.
Prices
On the second tab, you can set up payment options, establish the price and choose payment methods. Here, the events calendar plugin proves to be very helpful. Users can choose s a fixed price or a tailored price. Also, select prices according to categories and date rates. For more insights about this, visit the Events pricing page. To read more about deposits, check out the Deposit payments page.
Customization
Finally, we’ve reached the third and last tab. Here, you’ll finish all your event details and launch the ticket sales. Choose from any of the following options:
- Photo gallery. Make your event look appealing by adding eye-catching The system will display them on the front-end event list.
- Set up the right colors. Your event must look stunning on the list. Therefore, you need to choose the right color scheme. Keep in mind that it won’t apply to the whole event but only to the buttons. The possibility to add the color code makes customization easier.
- Show your events on your WordPress site. By clicking this option, you allow your event to be shown on the front-end list. This is possible regardless of the event’s state (canceled, fully booked, open, or closed).
Want to learn more about Amelia? Here’s a small part of what it can do
Amelia is a powerful WordPress booking plugin that works flawlessly with WordPress sites of all kinds. It has a minimal, yet powerful appointment booking interface designed to ease your workflow, automate repetitive tasks, avoid double booking, and make appointment booking a breeze for your customers.
You can even have email notifications and SMS notifications so that nobody forgets about their appointment bookings.
In order to book an appointment, the complete user interaction takes a few clicks with this WordPress plugin. Moreover, with it you can accept payments via PayPal and Stripe, perfect for those who want to pay in advance to book appointments.
As a business owner, you can monitor KPIs in the WordPress dashboard and analyze other important data to keep a pulse on your business. Amelia is a straightforward, no-nonsense booking calendar plugin and an amazing option for those who want an around-the-clock solution for their WordPress site.
Amelia also has an Events Calendar module integrated within its features.
You can now automate your event bookings as well. To be more precise, it means that you will be able to schedule a single day, a multi-day, and also recurring events with Amelia.
Did we mention that you can manage multiple locations and that you have Google Calendar integration?
All of these and much more are under only one license, no add-ons are needed.
To test things for yourself, I’d suggest checking out the demos and seeing how things look on the front end as well as in the back end.
Medical/Health online booking page demo

A website of a demo private clinic, where a visitor can read about provided medical procedures and services, and schedule an appointment.
Barbershop booking page demo

A dummy WordPress website for Barbershops with online booking – a nice and easy implementation with the Bridge theme and the Amelia WordPress booking plugin.
Fitness Gym / Yoga booking page demo
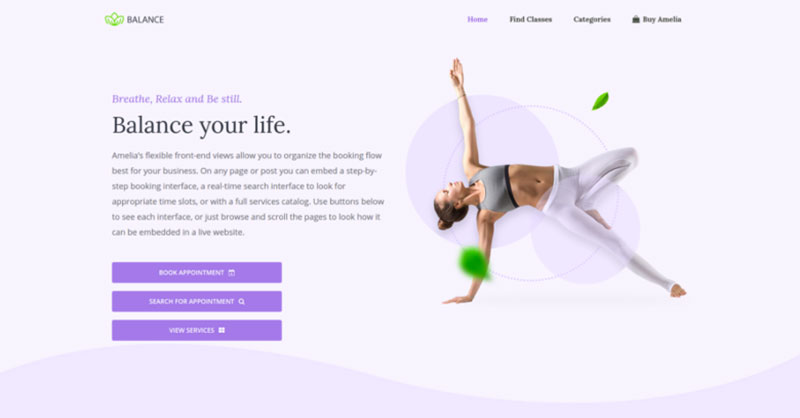
A pseudo Yoga/Gym online booking page where you can browse through possible Yoga classes, schedule individual or group training, and book a package of appointments.
Spa/salon booking page demo

A dummy cosmetology website – look through different cosmetic procedures and treatments, pick an employee and schedule appointments.
Consultant booking page demo

A pseudo Business Consultant / Coach / Lawyer website, where a customer can browse through provided consultancy and lawyer services and book an appointment.
A Conclusion on How to Create a WooCommerce Events Calendar
All in all, setting up a WooCommerce events calendar on your WordPress site is an excellent decision. With this all-in-one tool, you’ll be able to simplify the process: from displaying events to selling tickets, collecting payments, tracking event attendance and managing recurring events. By combining Amelia with WooCommerce, you’ll have all the features that event organizers need.
If you enjoyed reading this article about setting up a WooCommerce events calendar, you should check out this one with event WordPress themes.
We also wrote about a few related subjects like event planning tips, marketing strategies for ticket sales maximization, hybrid event ideas, and event management skills.
Not only that, but we also created articles about virtual event ideas, virtual event statistics, how to get sponsors for an event, tech conferences, and the most-watched sporting event.
Calendars are vital to getting your customers involved in events. An easily accessible calendar widget on your website can help your customers even more. When you add a calendar to your website, it keeps your community involved in future events like a personal and meaningful conversation. It can even attract more website visitors. However, many people don’t know how to add a calendar to a WordPress website, let alone know how to use all of the features that a good calendar should include.
To begin this process, you will need to find an events calendar plugin that works for you, and know the steps necessary to start publishing events on your website.
This article will explain how to add a calendar to WordPress. But first, let’s discuss why a calendar can help.
Why Do You Need a Calendar?
Put simply, it helps both you and your users.
A calendar is a great tool to help organize information and plan future events. It can be used for anything from training sessions to seminars.
Using a calendar, you can:
- Display upcoming, current, or even past events.
- Illustrate your schedule in an easy-to-understand way (e.g., showing not justthe time slots of sports classes, but also which teams you are training in that time slot).
- Help mark important dates in your memory.
- Show appointments (or possibly recurring appointments) for specified dates.
- Show booking details and availability for customers (for hotels, conference halls, meeting rooms, etc.).
- Book recurring events.
- Book virtual events.
- Spread awareness of future events or of your brand as a whole.
- Streamline the booking process if you work in a service-based business.
- Last of all, you can increase your website visitors. Google’s search engine particularly enjoys updated content, so adding a Google Calendar to your WordPress site can help increase the number of updates Google sees.
How to Add a Calendar to WordPress Easily With Amelia
If your business primarily relies on appointments, you may need more than your run-of-the-mill event calendar. This is where Amelia shines. Amelia lets you accept online payments, list bookable events, and even select your employee’s availability.
Using the Amelia plugin, clients can easily book appointments with employees for any of their services. It has a very simple and effective interface that helps make automated bookings quick and easy. People can book their appointments using either online or offline payments, which can even further simplify the booking process.
If you run into any problems getting started, the community of Amelia users can help you. They are all willing and ready to offer support and training on how to add a calendar to WordPress.
Also, Amelia offers multiple customization options to match your booking forms with your brand. Do you have a specific color scheme for your website? Your booking forms can help match that color scheme and improve your brand recognition.
Accessing the Calendar Page in Amelia
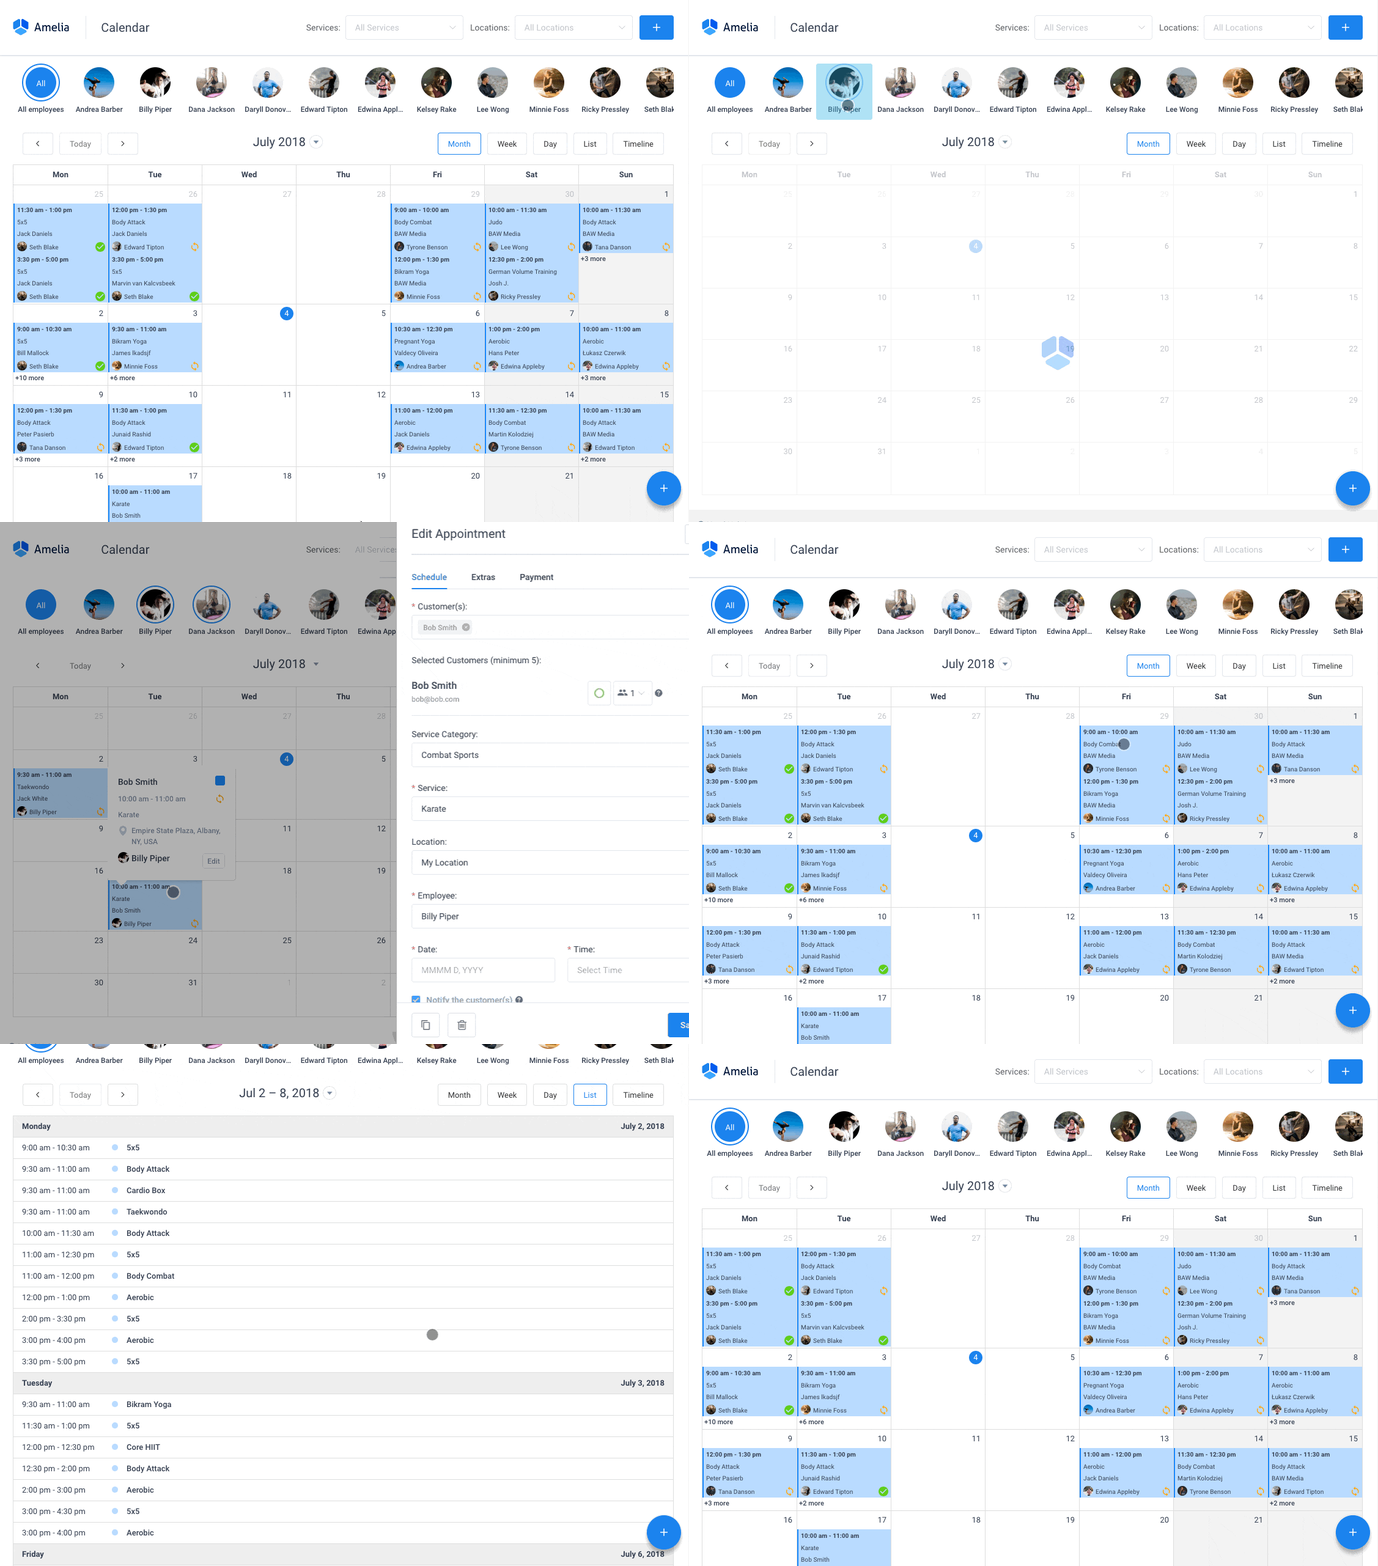
Amelia’s calendar page is very user-friendly, both because of its organization features as well as its filter functions. You can organize your calendar by employee, service, or location. If that’s not enough for you, you can easily search and find related events with the multiple filters available.
There are five different ways to view your calendar: “Day,” “Week,” “Month,” “Timeline,” and “list,” the default being “Week.” On the default setting, your calendar will display seven columns, each representing a day of the week.
The calendar blocks are all used to store necessary information about events or appointments. They often provide information such as the date and time of an appointment, which employee is assigned to it, the service to be provided, the location of the service, the customer, and its current status.
Add Events Calendar to a Page
To add booking forms to your website, you will need to add some shortcodes to the WordPress dashboard of your website. Below you will find some instructions on how to write Amelia’s shortcode using a couple of page builders such as Gutenberg, Elementor, and Classic Editor.
If you use a different page builder or can’t find the shortcode button, you can simply use this shortcode to add the “Events” calendar booking form:
[ameliaevents type=calendar]
After inputting the shortcode on the page, simply select “Publish” or “Update.”
Elementor Page Builder
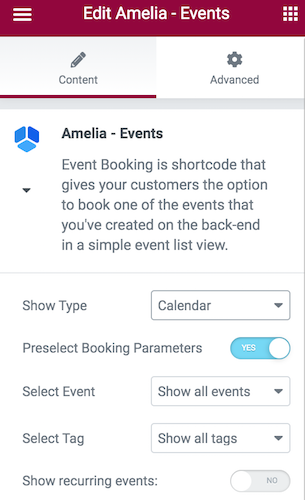
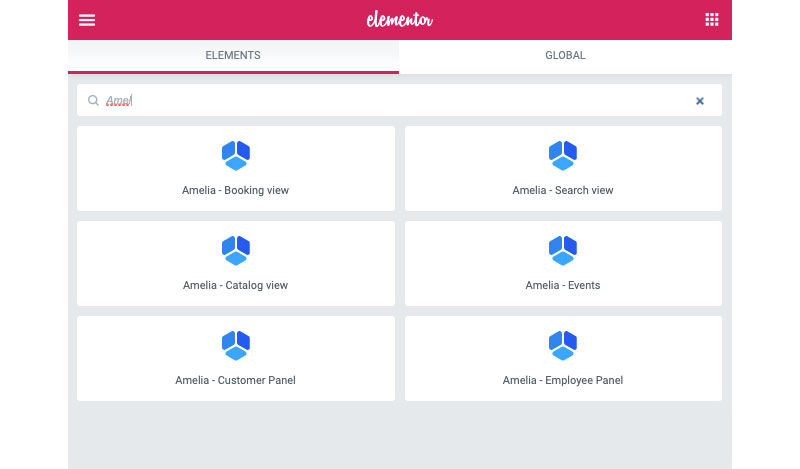
When you enter the Elementor Page Builder with the Amelia plugin installed, you will be able to search “Amelia” and find the Amelia blocks ready in your interface.
When you select the block you want, simply place it onto the page. Next, if you selected events, you will see more options on the left side. There you will have the option to choose “List” or “Calendar” views. If you also allow “Preselect Booking Parameters,” you will be able to select a singular event and see all your appointments that are connected to that event. You can then give your items tags and further simplify the searching process.
Classic Editor
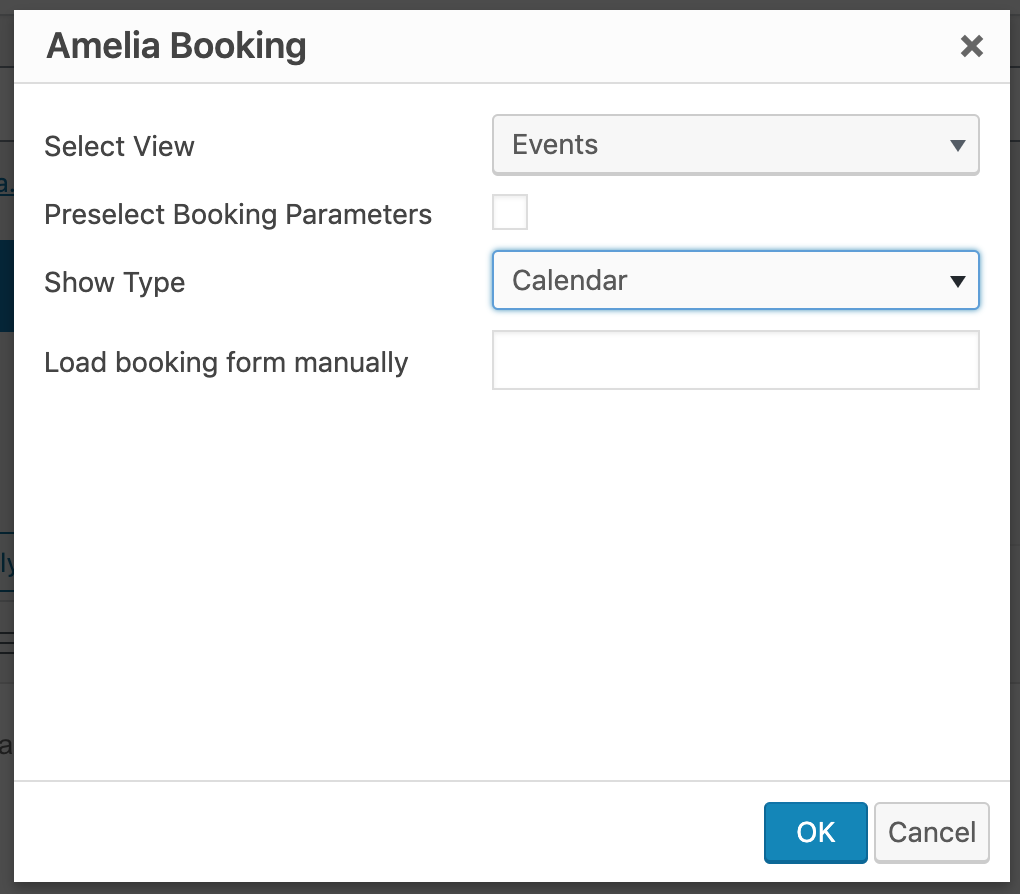
To start, select “Pages” in the admin panel for your WordPress site, and select “Add New.” There you will see “Amelia” in the list of shortcode in your TinyMCE editor.
Once you have selected the shortcode, your booking widget will open. Then, in “Select View,” click on “Events” in the drop-down menu. There you will see the option “Show Type,” with the default “List View” pre-selected. Instead of this, select “Calendar View” and the shortcode will automatically change. Last, of all, select “OK” and “Publish” to finish your new calendar.
Gutenberg Blocks
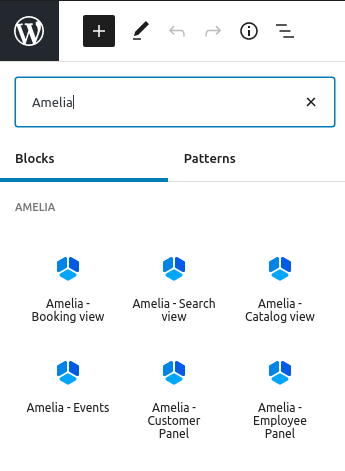
To start, go to WP Pages and choose “Add New.” Then, in the top right corner, you will see the “+” or “Add Block” option. Once you select this option you will be able to choose Amelia from a menu or write Amelia in the search tab.
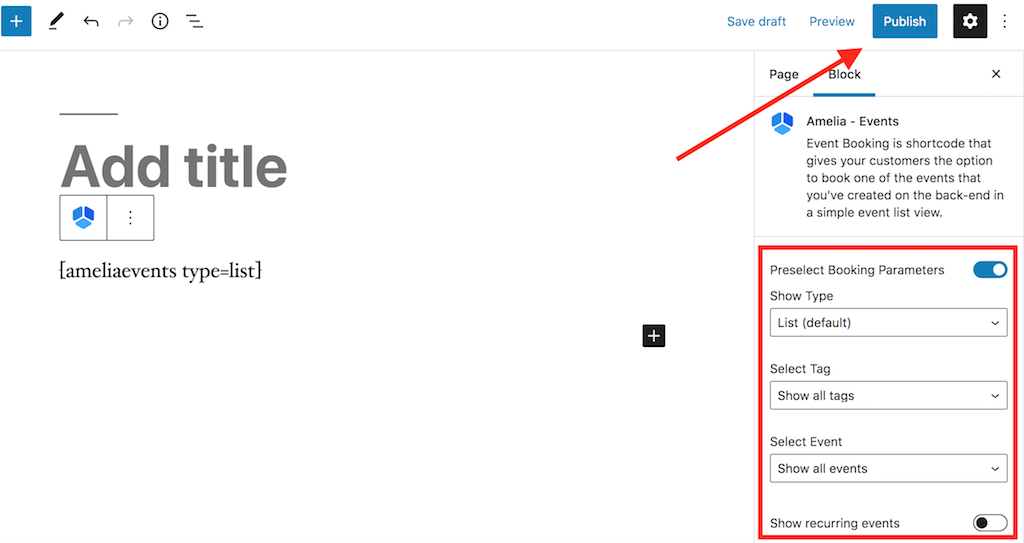
When you select an option for displaying a booking form, the shortcode will already be in the block. Next, select “Events” from the list of Amelia blocks to see more advanced features for the shortcode. you can select either a List or Calendar View (List View being the default), and after enabling the “Preselect Booking Parameters” option, you will have even more options to choose from.
When you are finished preparing your shortcode, select the “Publish” function to save and publish your page.
Events Calendar Booking View on FrontEnd
Next, Let’s discuss the options you have available to you in the “Event Calendar Booking View.”
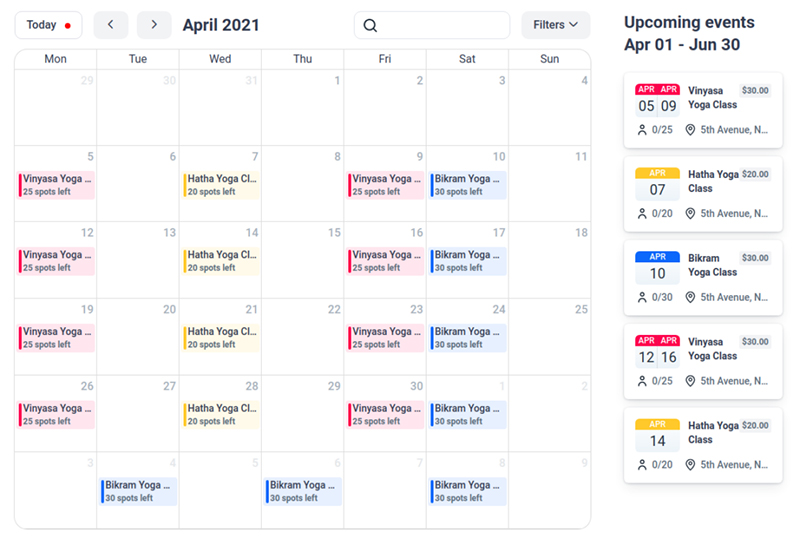
- Search – The search option lets your clients search for an event based on the event name.
- Arrows – You have the option to use arrows for your client’s calendar view to help them switch from month to month to see more of your events.
- Today – Using the “Today” option can help your clients have a point of origin to go to at any time. This can be especially useful if they go deep searching for an event over multiple months.
- Filters – Filters give your site visitors more options to view your new calendar. They can filter all your events based on location, the employee assigned, its current status, and other event options.
- Calendar Widget – The “Calendar” section shows all your events for the current month. If you have multiple events that happen on the same day, both will be shown in upcoming events with the “+X Events” label. Once selected, website visitors will be able to see all upcoming events in the pop-up and will be able to see all necessary event details. The event calendar will also show any open time slots for each new event, as well as how many event tickets are left.
- Upcoming Events – In the “Upcoming Events Widget” you will be able to see future events starting from the current date or the month of your choice. This section lets your site visitors learn more about multiple future events and book the one of their choosing.
Booking Through Events Calendar
After your site visitors have seen your new events in your calendar widget, they can select an event of their choice and see all of the booking options available to them.
In the “Event Details” area, your potential clients will see options including:
- The event title and current status of the event (“Closed for booking,” “Open for booking,” or “canceled”)
- An event gallery: a large gallery of photos for potential clients
- Starting and ending dates of the event
- Number of open event tickets
- Total capacity and address of hosting location
- All relevant event tags
- A written description of the event
- Names of event hosts
- Event cost
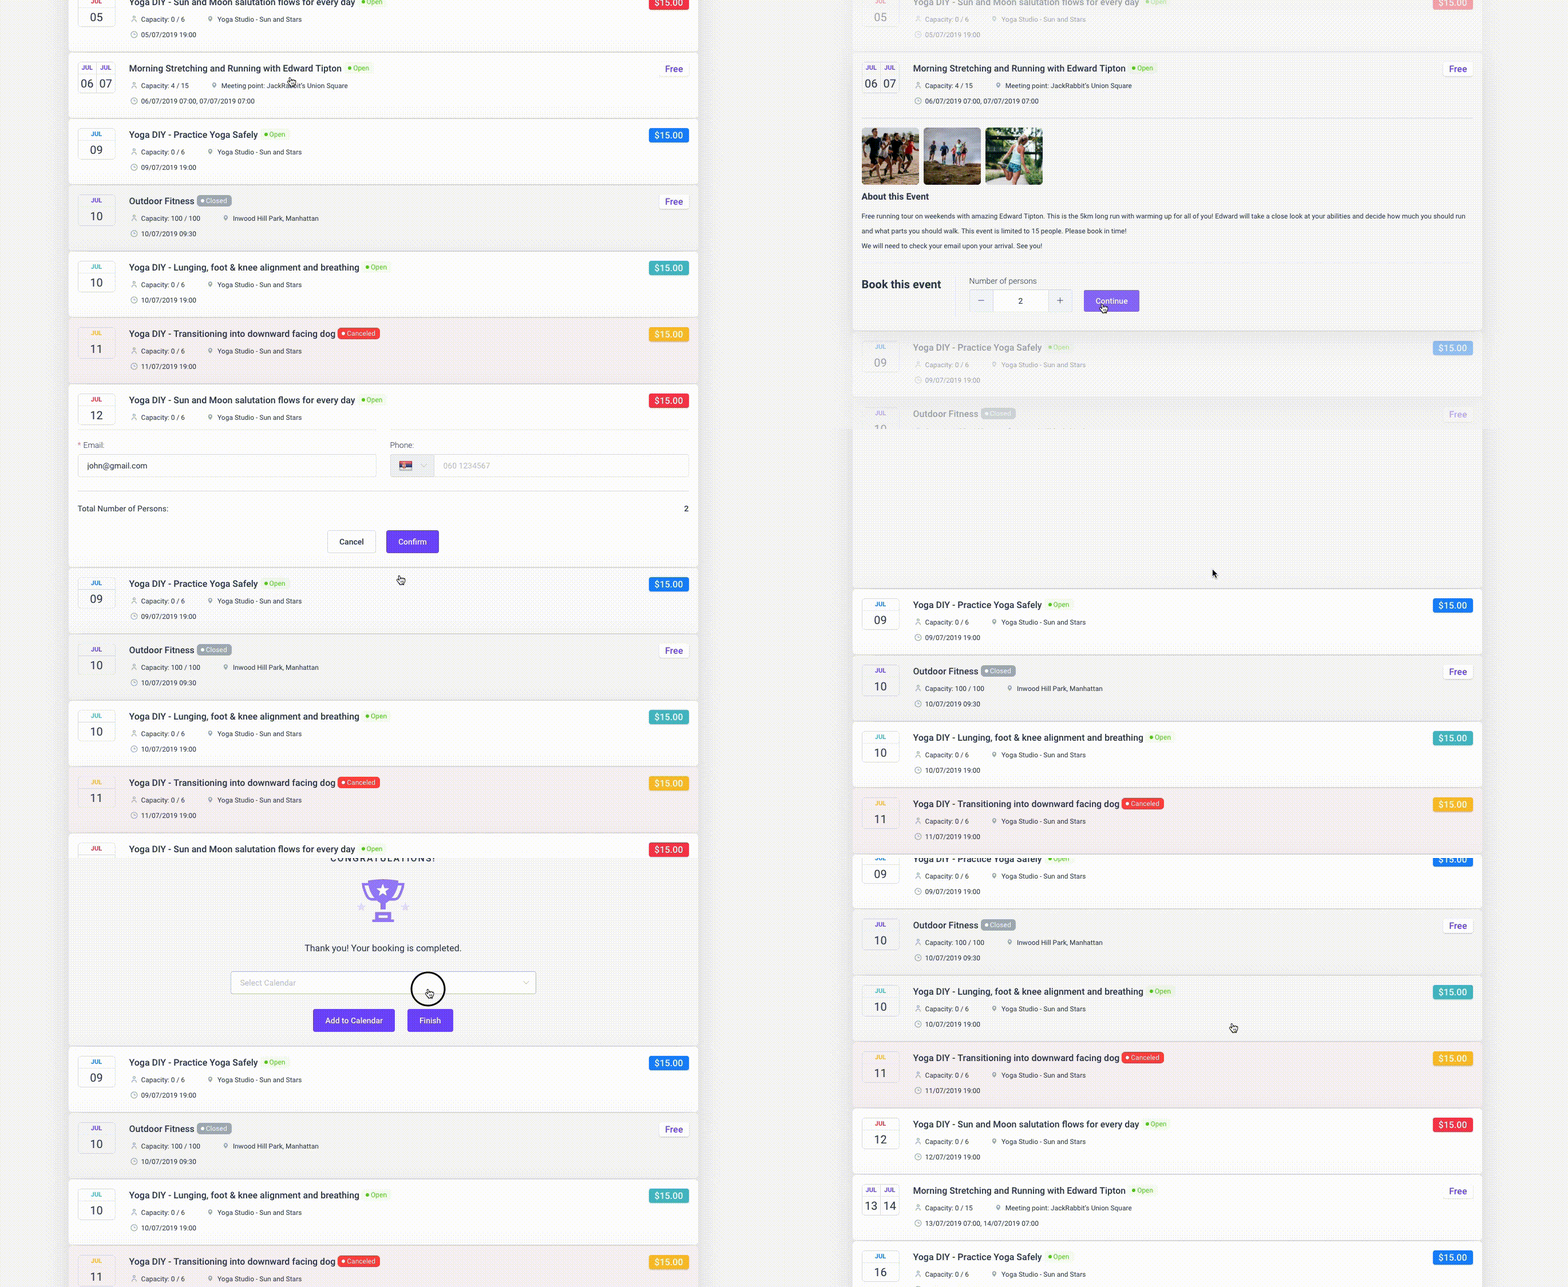
The final steps of the booking process are much the same as for the Event List. Depending on what settings you have already put in place, the attendee will be able to select how many event tickets they would like to purchase (depending on the “Allow bringing more persons” option) when in the “Book Now” screen.
After that, the attendee can select “Continue” to enter a page with the attendee’s details as well as a list of payment options. After they have entered all of the necessary personal information, the attendee can finish the booking process with their purchased event tickets.
Why Should You Know How to Add a Calendar to WordPress?
Knowing how to add a calendar to WordPress helps your business both in marketing and search engine optimization. Also, events can be a great way to demonstrate your expertise to your customers and even potential clients. It’s a win-win!
Allowing your site visitors to enjoy your products or services can not only help generate interest in your company but also enhance your credibility, thereby, cementing your company into the mind of your customers.
Want to learn more about Amelia? Here’s a small part of what it can do
Amelia is a powerful WordPress booking plugin that works flawlessly with WordPress sites of all kinds. It has a minimal, yet powerful appointment booking interface designed to ease your workflow, automate repetitive tasks, avoid double booking, and make appointment booking a breeze for your customers.
You can even have email notifications and SMS notifications so that nobody forgets about their appointment bookings.
In order to book an appointment, the complete user interaction takes a few clicks with this WordPress plugin. Moreover, with it you can accept payments via PayPal and Stripe, perfect for those who want to pay in advance to book appointments.
As a business owner, you can monitor KPIs in the WordPress dashboard and analyze other important data to keep a pulse on your business. Amelia is a straightforward, no-nonsense booking calendar plugin and an amazing option for those who want an around-the-clock solution for their WordPress site.
Amelia also has an Events Calendar module integrated within its features.

You can now automate your event bookings as well. To be more precise, it means that you will be able to schedule a single day, a multi-day, and also recurring events with Amelia.
Did we mention that you can manage multiple locations and that you have Google Calendar integration?
All of these and much more are under only one license, no add-ons are needed.
To test things for yourself, I’d suggest checking out the demos and seeing how things look on the front end as well as in the back end.
Medical/Health online booking page demo

A website of a demo private clinic, where a visitor can read about provided medical procedures and services, and schedule an appointment.
Barbershop booking page demo

A dummy WordPress website for Barbershops with online booking – a nice and easy implementation with the Bridge theme and the Amelia WordPress booking plugin.
Fitness Gym / Yoga booking page demo

A pseudo Yoga/Gym online booking page where you can browse through possible Yoga classes, schedule individual or group training, and book a package of appointments.
Spa/salon booking page demo

A dummy cosmetology website – look through different cosmetic procedures and treatments, pick an employee and schedule appointments.
Consultant booking page demo

A pseudo Business Consultant / Coach / Lawyer website, where a customer can browse through provided consultancy and lawyer services and book an appointment.
If you enjoyed reading this article about how to add a calendar to WordPress, you should check out this one with event WordPress themes.
We also wrote about a few related subjects like event ticketing apps, adding an event calendar on a website, and Divi Events calendar alternatives.
Not only that, but we also created articles about creating tickets for events, setting up recurring events on a WP site, how to sell tickets on WordPress, Elementor event calendar plugins, and creating a church event calendar.
Oftentimes, when your customers are about to book a service, they discover that the time interval they had in mind is not available. At that point, they might look for another provider who offers a flexible service length. That is where having custom duration services as part of your booking system can make a difference.
If you are in a salon industry that provides services such as massage, you are familiar with the custom service duration requisite. The good news for Amelia users is that you now have that option! Our team recognized your need for a custom duration feature and brought it to life with the most recent 5.3 update.
The feature is applicable to the salon industry and individual classes, though not exclusively. Performance of different service components can vary, as well as employee skill level. And this stands for a wide range of businesses.
Our team developed an option to configure as many custom duration service scenarios as you want with the following pricing. After configuring, you give your customers the possibility to choose between predefined duration and price options.
How to Configure a Custom Duration Service?
Before this feature, users could only set one duration and price for each service. Now, the administrator can set a default duration and price for each service accordingly. You can offer a single service with multiple durations, as well as define different prices for these durations per employee.
Furthermore, once you activate and define a custom duration for a specific service, each employee is able to define prices for each interval. Keep in mind that you can change the duration of these intervals only on the service level. Though configuring different prices for the selected employee is possible. You can learn everything about this here.
How Does It Look on the Front End?
Custom duration services have no additional settings. Multiple duration periods, when configured, are displayed above the calendar.
During booking, customers will have a dropdown to select the duration and book time and pricing based on that. The offered time slots will vary depending on the employee’s availability, work hours, and other service appointments.
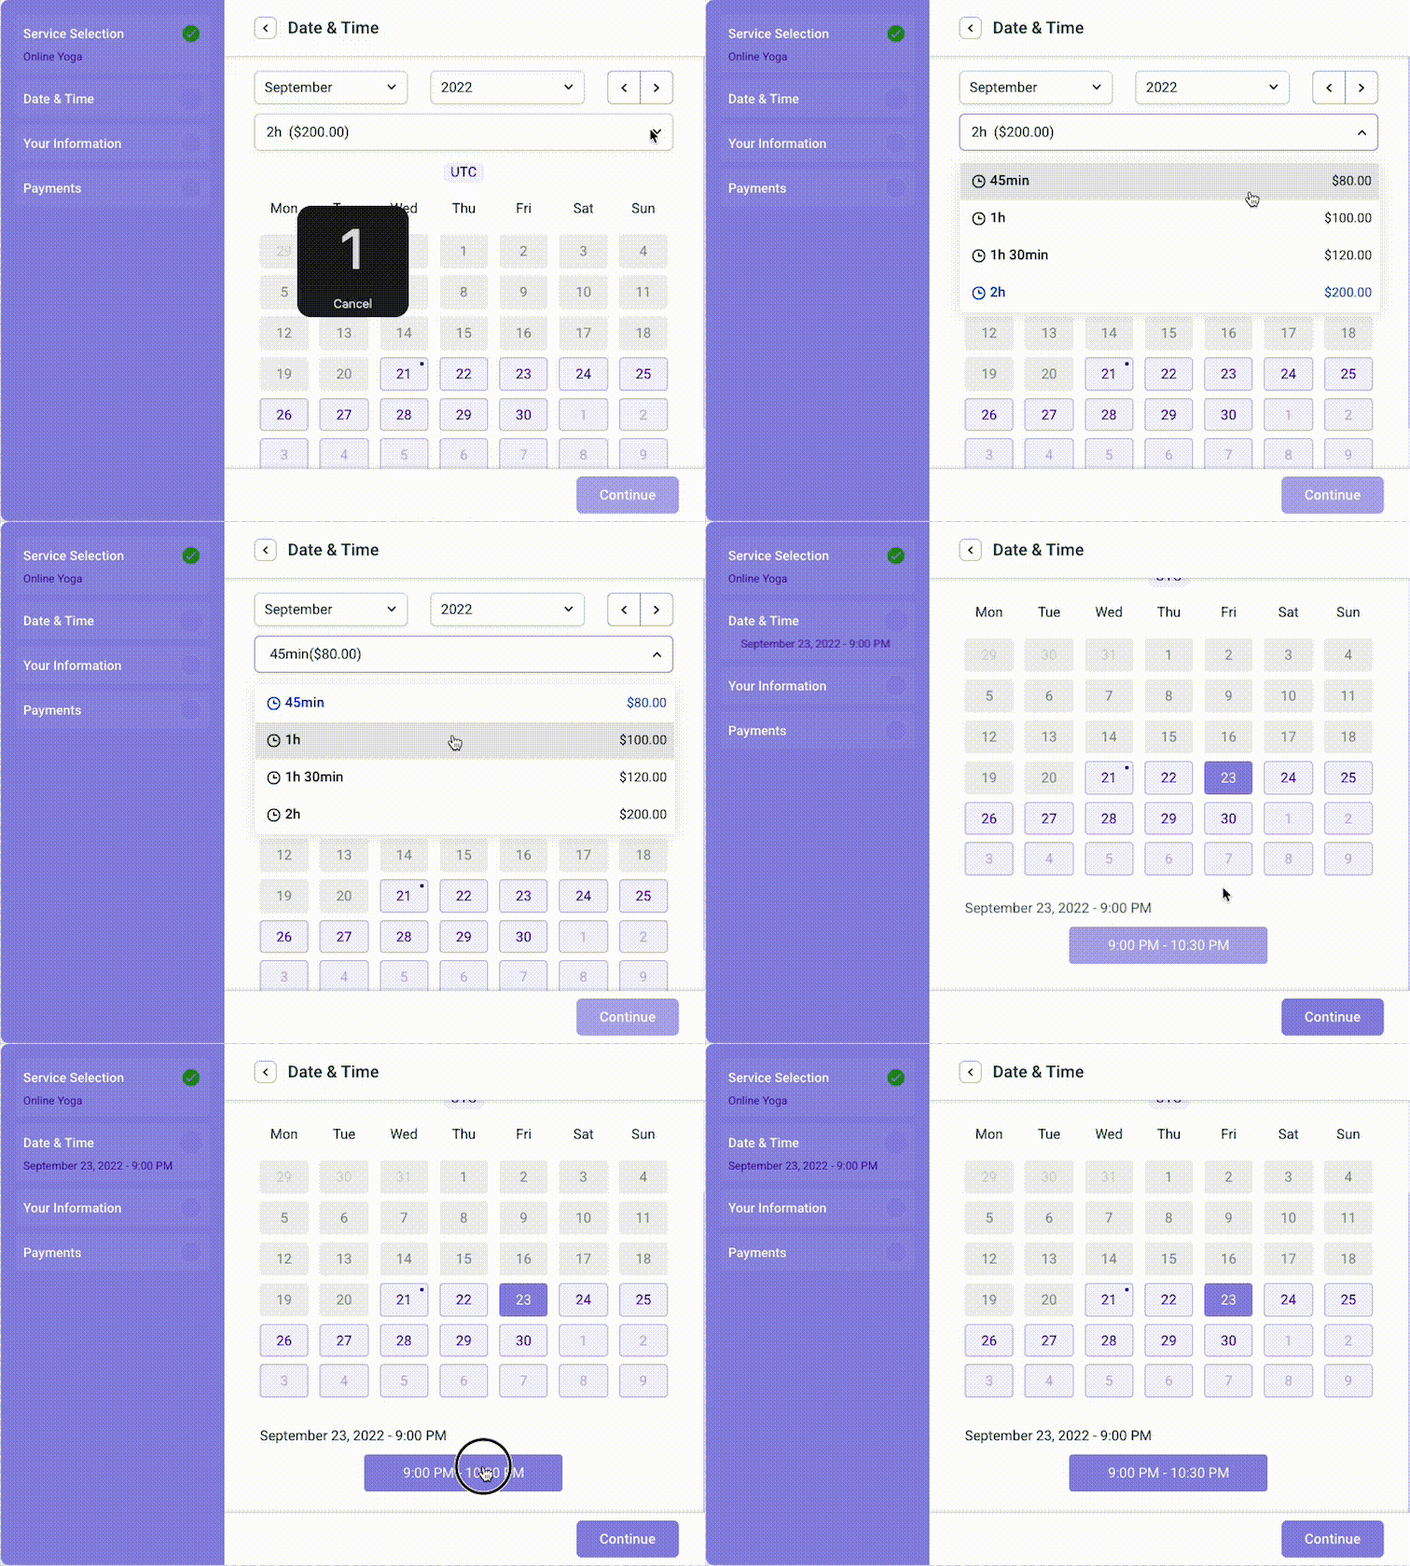
How Does It Look at the Back-End?
After enabling this feature in the service section, you can easily configure durations and prices.
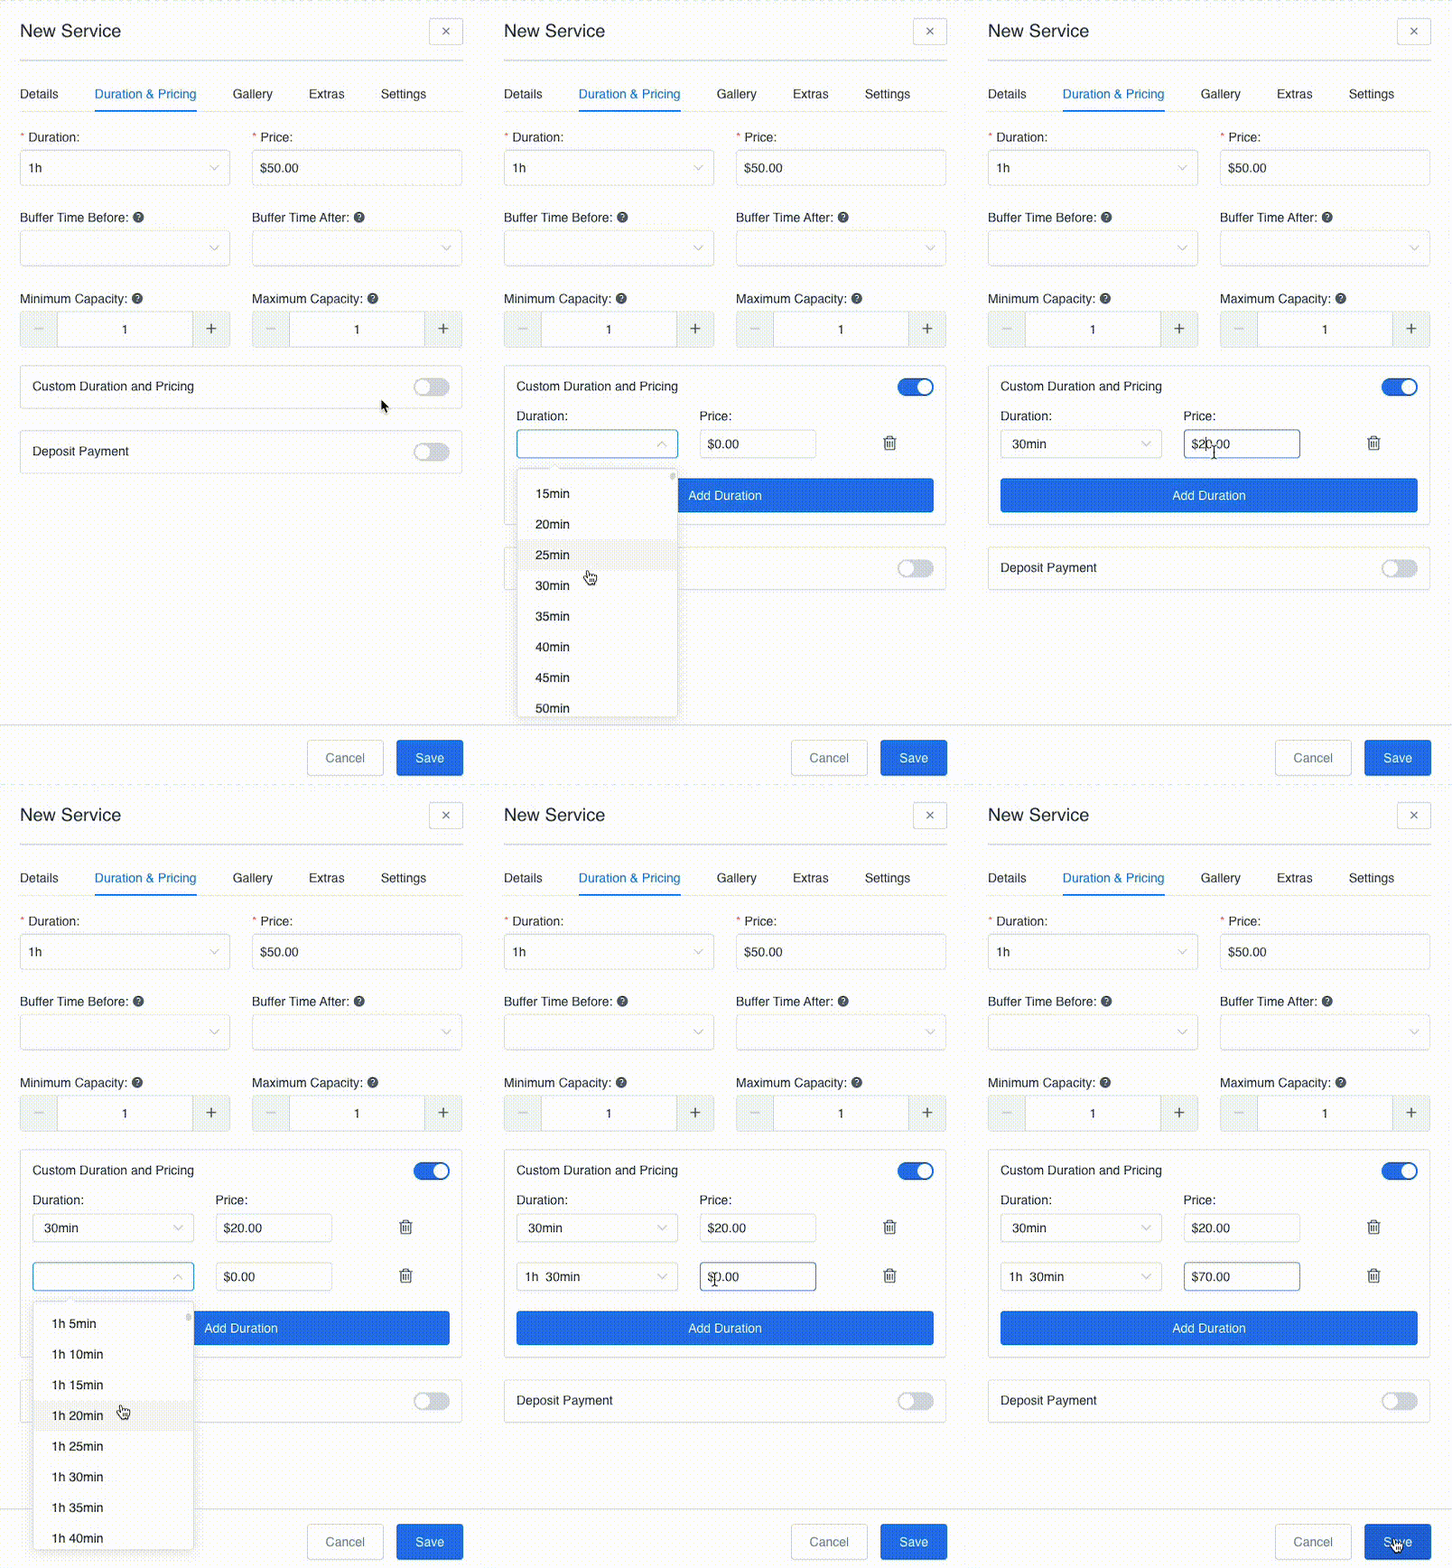
When you book a service from the back-end, configured intervals are listed within the dropdown menu next to a customer field. You can learn more about this here.
A Bit About Our Next Plans
The custom duration feature was the main feature of the latest 5.3 update. However, In the next period, we plan to introduce the following features:
- Multiple locations: the option to add additional locations for a single employee so that the location can be changed based on scheduled appointments;
- Resources: the ability to create resources that are shared among employees, services, and/or locations in order to prevent future bookings when the resource is depleted;
- Employee Description: the option to add an employee description and display it on the form (for now only for the new step-by-step form);
- Catalog 2.0: the new booking form;
- Limit appointments per customer: the option to limit the number of appointments that the customer can make in a certain time segment-day, week, month, or year;
- Remembering the language of the customer so that when the appointment is booked from the back-end, notifications are translated to the preferred language;
- A limit on how many additional people a customer may add;
- Option to collapse the sidebar on the new Step-by-step 2.0 form;
Stay tuned, as we are always transparent about what we do, and we love keeping you updated!
According to a report issued by Grand View Research, Inc., the online event ticketing market is expected to see an increase of up to USD 67.99 billion by 2025. Purchasing event tickets online is not only easier, but more accessible than ever—great reasons to sell tickets online when hosting your event.
Selling tickets online is a fast and effective way to take your event from a no-show due to a sold-out triumph. Potential attendees can now buy tickets on any device, anywhere and at any time.
You want visitors to register for your events, but selling tickets manually is time consuming and takes a great deal of effort. WordPress plugins have stepped in to make the process simpler for you to go from manual to automatic.
You can now sell tickets on WordPress sites using WordPress e-ticket plugins which allow you, the event organizer, to both set up an event and generate e-tickets.
Why Sell Event Tickets
It is now possible to collect event tickets directly from your own WordPress site without having to send guests to a pricey third-party website. Instead, lead the traffic to your site, moderate all event details and register attendees from there—there’s no downside to it!
Let’s take a look at the pros of selling tickets on your WordPress site as opposed to a third-party site:
- By using a plugin on your site, you cut costs as you eliminate any extra processing fees for ticket sales.
- It is easy to manage, since you’re hosting it directly from your website.
- Boost visitor numbers and promote your brand by prompting event ticket sales to your
- Personal customer data such as name, email, and payment information is stored on your servers. Security is crucial, since hosting all the code also means you host all the user data.
- All event details and registration of attendees is carried out on one site.
- You manage the collection of payments.
- You can choose to connect with your events calendar.
Another bonus is you get the chance to make more money when you sell tickets through your site. Why can we say that? Plugins, like Amelia, mean you don’t have to worry about paying a third-party site to sell tickets; so you end up recovering overhead costs faster.
How Do You Sell Tickets on WordPress With Amelia?
If you want to get back money spent on your event (be it a concert, a big bash, or a networking conference), and even make a profit; then you need to sell tickets. And you need to get a grasp on how to sell tickets online with WordPress. The Amelia WordPress events plugin is one of the best plugins out there, and it will manage all the event specifics for you.
This free plugin enables you to add and sell as many tickets as required, all through your business’s WordPress site. As we dive into the tutorial, we’ll presume you’ve already got a basic WordPress site set up.
We’re going to start by putting together your first event. Open the “Events” page and click on either the “+ New Event” or the “+” button on the bottom right of the page. This should then open the “New Event” dialog. Let’s check out the various options when you create events:
- Details. The first tab in the event creation process. It includes the following options:
- Name. Create a name for each event.
- Date. Schedule your event using the “Date”’ and “Time”
- Recurring. For multiple events that repeat occasionally.
- Booking Opens and Booking Ends. This option can help you decide if you create a booking period from the date the event is created up until it starts, or if you would like to select precise dates and times for one or the other.
- Apply This to All Recurring Events. If you do not click to check this option, the plugin will set a time to open and close the booking based on the time scheduled for the first event.
- Maximum Spots Allowed. This feature enables you to determine the maximum amount of event attendees you can accommodate.
- Allow Bringing More Persons. You can figure out exactly how many tickets you sell by giving guests the option to add more persons to the booking.
- Allow the Same Customer to Book More Than Once. You can select this option if you want to allow the same customer to book tickets more than once for a single event.
- Select Address. Display the event location, which visitors will find on the front-end event list.
- Staff. Make use of this function if you need to add employees to a particular event.
- Tags. Create and name the tag for your event. When visitors to your WordPress website filter the events, they will see the various tags displayed on the front-end event list.
- Description. This is where you enter an informative description of your event. It can be found under event details on the front end; you can include details about the schedule, capacity, and other relevant notes.
- Pricing. The second tab when creating events to sell tickets on WordPress sites. Set up the ticket fees and deposit options for the event.
- Customize. A third tab used in the creation of an event.
- Event Gallery. Add images, which will be showcased on the front-end event list.
- Event Colors. Pick a color to represent your event on the front-end list.
- Display Event on Site. With this option, event organizers can decide if they would like to display their event on the front-end events list.
Events Pricing
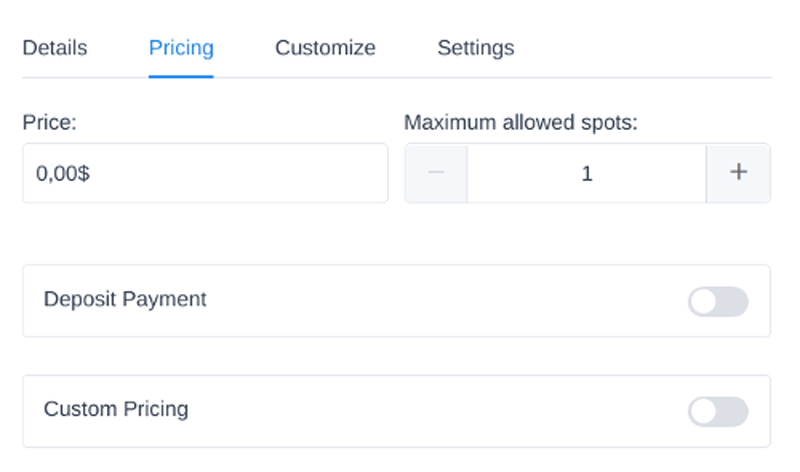
As you go about creating your event, you will come across the “Pricing” tab. You can use this to determine a specific price and capacity for the event. There is also an option to choose a custom price for event tickets.
The Amelia Events custom pricing function enables you to set up various event tickets for potential guests to purchase. You also have the option to determine pricing according to when a person books for a specific event; this allows you to make special offers like seasonal discounts or an early booking discount.
In the case of a recurring event, the price you set is only applicable for that specific event. The customer can only book for one event and not each recurring event, so the price does not accumulate with every recurrent event.
By selecting the “Custom Pricing” option, you will be given three options to set up the first pricing category to sell tickets on WordPress:
- Name. Pick a name for your pricing category.
- Price. Determine the price for a particular pricing category.
- Spots. This allows to set the maximum spaces available in any given pricing category.
The “Pricing by Date Range” option allows you to select a date range and determine the e-ticket amount for the pricing categories (tickets) you had set up for a particular period. This event tickets plugin enables you to set up various pricing options based on the dates your attendees pick when they purchase tickets for an event.
Sell Tickets on WordPress With Success
If hosting fun and exciting or informative and interesting events is part of the way your business establishes its brand, you must be determined to sell tickets online. And it’s important to ensure that you’ve put together an attractive sales pitch for your events.
When you assign ticket sales and the follow up of other tasks to your WordPress site, you can focus on meaningful tasks—like the organization and promotion of events. WordPress plugins for selling tickets, like Amelia, are able to digitize and centralize records from your event registration forms. This removes the stress of having to decipher handwritten notes or work through your inbox to verify how many spaces were booked and on which dates.
Getting the hang of how to sell tickets on WordPress will enable you to turn more than one event into a success. Start selling tickets online now and boost your brand, as you direct more traffic to your effective WordPress website.
Want to learn more about Amelia? Here’s a small part of what it can do
Amelia is a powerful WordPress booking plugin that works flawlessly with WordPress sites of all kinds. It has a minimal, yet powerful appointment booking interface designed to ease your workflow, automate repetitive tasks, avoid double booking, and make appointment booking a breeze for your customers.
You can even have email notifications and SMS notifications so that nobody forgets about their appointment bookings.
In order to book an appointment, the complete user interaction takes a few clicks with this WordPress plugin. Moreover, with it you can accept payments via PayPal and Stripe, perfect for those who want to pay in advance to book appointments.
As a business owner, you can monitor KPIs in the WordPress dashboard and analyze other important data to keep a pulse on your business. Amelia is a straightforward, no-nonsense booking calendar plugin and an amazing option for those who want an around-the-clock solution for their WordPress site.
Amelia also has an Events Calendar module integrated within its features.

You can now automate your event bookings as well. To be more precise, it means that you will be able to schedule a single day, a multi-day, and also recurring events with Amelia.
Did we mention that you can manage multiple locations and that you have Google Calendar integration?
All of these and much more are under only one license, no add-ons are needed.
To test things for yourself, I’d suggest checking out the demos and seeing how things look on the front end as well as in the back end.
Medical/Health online booking page demo

A website of a demo private clinic, where a visitor can read about provided medical procedures and services, and schedule an appointment.
Barbershop booking page demo

A dummy WordPress website for Barbershops with online booking – a nice and easy implementation with the Bridge theme and the Amelia WordPress booking plugin.
Fitness Gym / Yoga booking page demo

A pseudo Yoga/Gym online booking page where you can browse through possible Yoga classes, schedule individual or group training, and book a package of appointments.
Spa/salon booking page demo

A dummy cosmetology website – look through different cosmetic procedures and treatments, pick an employee and schedule appointments.
Consultant booking page demo

A pseudo Business Consultant / Coach / Lawyer website, where a customer can browse through provided consultancy and lawyer services and book an appointment.
If you enjoyed reading this article about how to sell tickets on WordPress, you should check out this one with event WordPress themes.
We also wrote about a few related subjects like event ticketing apps, adding an event calendar on a website, how to add a calendar to WordPress, and Divi Events calendar alternatives.
Not only that, but we also created articles about creating tickets for events, setting up recurring events on a WP site, Elementor event calendar plugins, and creating a church event calendar.
An event calendar widget is an indispensable tool if you are looking to turn your event into a triumph. It will enable you to not only advertise your event to current and new clients, but also to handle all event details with ease.
Whatever category your WordPress site falls under, eventually you’re going to look for opportunities to invite visitors to a variety of events—a great move to get your brand out there! Perhaps you write about the latest music on your blog or host a website for a local community collective; maybe it’s a webpage showcasing a professional organization, or you’re just sharing what you know about WordPress; there are weekly upcoming events relevant to your theme or subject.
Users will know about these events if you create an event calendar on website pages. You might have a daily lineup of events on your events calendar, or it could be a one-of-a-kind event; these calendars will connect you with your audience and draw in more visitors to your website.
Why Display an Event Calendar on Your Website?
By publicizing an event with an event calendar, you draw more users to your site, since the calendar functions as a secondhand means of promoting your brand. And when you display events on your website, you nurture more interest in your product or service within your dedicated community.
The events page can also be used to lead visitors to other content on your website (such as links to specific blog posts or to the online store), a powerful way to multiply traffic to your site.
An event calendar on website pages gives you access to useful insights and metrics, for example, email and contact details from your client base, as well as ticket sales data. If you link your email marketing strategy with your events calendar, you can automate registration reminders, follow-ups, and announcements via email.
Another plus to featuring an events calendar is the additional number of pages it adds to your site. So when you link up a particular event with its own page, you end up creating more content in the framework of the website. And of course, the more pages your site boasts, the more chances your site has of ranking well for particular keywords. In fact, just by simply adding an events calendar, you can gain more traffic to your site and even enhance its overall performance.
Remember too, that as you update the event calendar on website pages, you are also creating new and original content. By setting up the ideal SEO that fits perfectly with the ideal content, you boost your brand’s online presence and add to its audience.
Ultimately, event calendars can really give that extra push to your marketing goals. And those goals are achieved with an online tool that allows current and potential customers to keep up to date with upcoming events.
Are you eager to add an events calendar to your WordPress site? We enthusiastically suggest you check out the Amelia events plugin.
There are a variety of appointment and event scheduling WordPress plugins available; some are superior to others. But if you are looking for a plugin that is more than capable of booking, scheduling, and managing payments for multiple events for classes or groups, one stands out: Amelia.
This plugin enables you to create events and present them on your WordPress website with ease. You are also able to add titles and descriptions to the events calendar, set the date, time, and pricing of the event, and so much more. Create shortcodes which you can then display throughout the WordPress site.
In this post, we’re going to clue you in on how to display an events calendar on a site powered by WordPress.
Events Calendar Booking View in the Amelia WordPress Booking Plugin
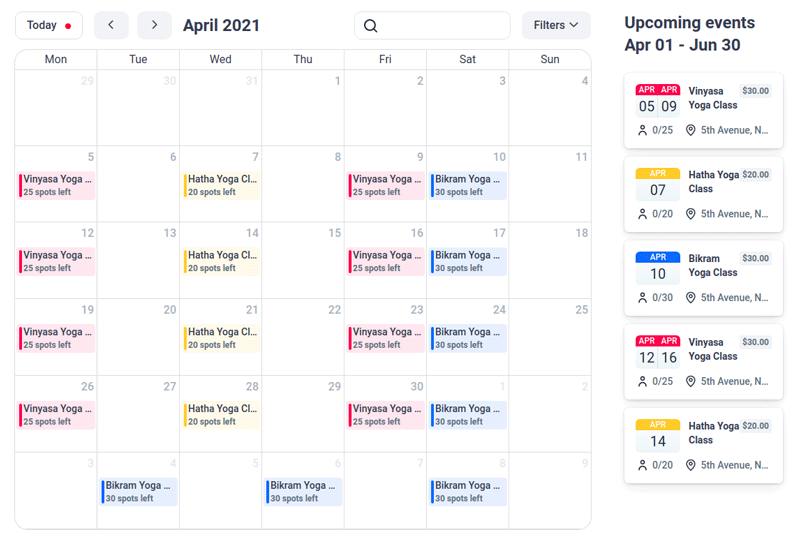
The Events Calendar Booking View provides the choice of displaying event data in the form of a monthly calendar. With a few clicks, your users can simply view events in the current month, select, and then book the event.
Add Events Calendar to a Page
If you want to add a booking form to your site, you have to add an Amelia shortcode to one or several pages. The following is a set of instructions on how to apply Amelia shortcodes using the Gutenberg, Elementor, and Classic Editor page builders.
In case you go with another page builder or cannot locate the shortcode button, use this shortcode to create an events calendar booking form:
[ameliaevents type=calendar]
Enter the shortcode on the page and press “Publish” or “Update.”
Gutenberg Blocks
Go to “WP Pages” and select “Add New.” The “+” (“Add Block”) appears either in the top right corner or below the page title. You can click on “Amelia,” or you can type “Amelia” into the search box.
Click on one of the options for displaying the booking form—you should see the shortcode in the box. In the Amelia blocks list, select “Events,” and a right panel will display more shortcode options. You can either pick the “Calendar” or “List View,” which is a default option. If you click on “Preselect Booking Parameters,” you can choose if you would like to display one specific event or a recurring event by selecting a tag added during the creation of the events calendar.
Elementor Page Builder
As you can see in the featured image below, you can search for Amelia or scroll for the Amelia blocks within the Elementor interface once you’ve opened the Elementor Page Builder editor on the website with the installed Amelia plugin.
Drag and drop the block you want onto the page. Then select “Amelia—Events” and a menu with additional options will pop up. You can select “List” (default) or “Calendar View.” Enable the “Preselect Booking Parameters” option if you would like to display one specific event, an event with all its recurring events, or one specific sort of event.
Classic Editor
In the WordPress admin panel, select “Pages” and then click the “Add New” button. The “Amelia” insert shortcode button will be visible in your TinyMCE editor. Click to open the Amelia booking widget.
In the “Select View” dropdown menu, click on “Events” and then click on the next option, “Show Type.”
Events Calendar Booking View on Front End
Now we will work through each available option on the Event Calendar Booking View:
- Today. An option that allows attendees looking for particular events, throughout various months, to easily return to the current day and month.
- Arrows. Enables attendees to conveniently shift month to month through a single event page (or more) when searching your events.
- Search. Attendees can search for an exact event by name.
- Filters. Provides more options for users to filter events in relation to a certain location, an authorized host/employee, status, and type (all added as per the tags created during the event design process).
- Calendar section. Previews the events for the current month. If there are various events on the same day, the first two are displayed by name and the rest appear below with the label “+X Events.”
- Upcoming events. In this section, upcoming events are displayed beginning with “Today,” or if you select another day in the month starting from that date.
Booking Through Events Calendar on Website Pages
As potential attendees navigate through the events on offer, they can select a specific event for that month or one in the Upcoming Events list. It then shows details related to that particular event, and the users have the option to book event tickets.
Your attendees will be able to check out the following features in the Event Details section:
- Name of the event
- Event gallery
- Start and end date of event
- Event tags
- Event description
- Event schedule (start and end time is made available)
- Event hosts
The remaining features of the booking process are similar to those found on the Events List. Your attendees will have the option of adding more people to the event by clicking on the “Book Now” button; the option to add more people is given. This is also determined by the capacity you’ve set for the event as well as whether you have made the option to add more people available to those booking on the event calendar on website booking forms.
Getting the Most From Your Event Calendar on Website Pages
There can be no doubt that adding an events calendar to your site is a great way to promote and sell tickets for your upcoming events. An event calendar is also a fantastic way you can simply and easily display events and share event details with visitors, and it makes them want to know more!
Amelia is a free plugin that is a fully automated and efficiently integrated answer to your event management, booking, and payment needs. It showcases a flexible front-end design and a UX that is attractive to both event organizers and Amelia plugin users. Amelia works for you around the clock to manage your event calendar on website pages seamlessly and effortlessly, so you don’t have to.
Want to learn more about Amelia? Here’s a small part of what it can do
Amelia is a powerful WordPress booking plugin that works flawlessly with WordPress sites of all kinds. It has a minimal, yet powerful appointment booking interface designed to ease your workflow, automate repetitive tasks, avoid double booking, and make appointment booking a breeze for your customers.
You can even have email notifications and SMS notifications so that nobody forgets about their appointment bookings.
In order to book an appointment, the complete user interaction takes a few clicks with this WordPress plugin. Moreover, with it you can accept payments via PayPal and Stripe, perfect for those who want to pay in advance to book appointments.
As a business owner, you can monitor KPIs in the WordPress dashboard and analyze other important data to keep a pulse on your business. Amelia is a straightforward, no-nonsense booking calendar plugin and an amazing option for those who want an around-the-clock solution for their WordPress site.
Amelia also has an Events Calendar module integrated within its features.

You can now automate your event bookings as well. To be more precise, it means that you will be able to schedule a single day, a multi-day, and also recurring events with Amelia.
Did we mention that you can manage multiple locations and that you have Google Calendar integration?
All of these and much more are under only one license, no add-ons are needed.
To test things for yourself, I’d suggest checking out the demos and seeing how things look on the front end as well as in the back end.
Medical/Health online booking page demo

A website of a demo private clinic, where a visitor can read about provided medical procedures and services, and schedule an appointment.
Barbershop booking page demo

A dummy WordPress website for Barbershops with online booking – a nice and easy implementation with the Bridge theme and the Amelia WordPress booking plugin.
Fitness Gym / Yoga booking page demo

A pseudo Yoga/Gym online booking page where you can browse through possible Yoga classes, schedule individual or group training, and book a package of appointments.
Spa/salon booking page demo

A dummy cosmetology website – look through different cosmetic procedures and treatments, pick an employee and schedule appointments.
Consultant booking page demo

A pseudo Business Consultant / Coach / Lawyer website, where a customer can browse through provided consultancy and lawyer services and book an appointment.
If you enjoyed reading this article about displaying an event calendar on website pages, you should check out this one with event WordPress themes.
We also wrote about a few related subjects like event ticketing apps, how to add a calendar to WordPress, and Divi Events calendar alternatives.
Not only that, but we also created articles about creating tickets for events, setting up recurring events on a WP site, how to sell tickets on WordPress, Elementor event calendar plugins, and creating a church event calendar.
There are several reasons why someone might choose to look for alternatives to Divi Events Calendar. Maybe you are exploring your options for theme builders, and you wonder what other options are out there. If you have used Divi Events Calendar in the past, you might be looking for something that works better for you. Or you may be curious about how the alternatives compare.
Maybe you are looking for something that is more competitively priced. You might want an option that is easier to use and has better support. Or perhaps Divi Events Calendar isn’t quite what you need, and you are looking for a more complete solution.
This article will consider one of the best alternatives on the market and how it compares to Divi Events Calendar.
Why Look for a Better Alternative to Divi Events Calendar?
If you have a website that specializes in organizing events, you may have tried using Divi Events Calendar in the past. This calendar tool uses the existing tools in Divi builder and adds to them to better create calendar events.
The Divi Events Calendar plugin allows you to create and schedule events and add supporting content to an event. The trouble is that many people find that it takes them a long time to get used to Divi. Some people even say that it is very complicated for them to learn how to use Divi.
Another problem some people have with the Divi Events Calendar plugin is that it is based on The Events Calendar WordPress plugin. If this other plugin is not installed first, the Divi Events Calendar plugin doesn’t work properly.
In addition, there can be a lot of bloat on sites built with Divi plugins, which slows load speeds. This can result in less optimal website performance on websites that use Divi Events Calendar.
If you have seen this to be true, here is an alternative to the Divi Events Calendar.
Amelia, a Better Alternative to Divi Events Calendar
Amelia
Amelia is a powerful WordPress events plugin that works flawlessly with WordPress sites of all kinds. It has a minimal, yet powerful appointment booking interface designed to ease your workflow, automate repetitive tasks, avoid double booking, and make appointment booking a breeze for your customers.
You can even have email notifications and SMS notifications so that nobody forgets about their appointment bookings.
In order to book an appointment, the complete user interaction takes a few clicks with this WordPress plugin. Moreover, with it you can accept payments via PayPal and Stripe, perfect for those who want to pay in advance to book appointments.
As a business owner, you can monitor KPIs in the WordPress dashboard and analyze other important data to keep a pulse on your business. Amelia is a straightforward, no-nonsense booking calendar plugin and an amazing option for those who want an around-the-clock solution for their WordPress site.
Amelia also has an Events Calendar module integrated within its features.

You can now automate your event bookings as well. To be more precise, it means that you will be able to schedule a single day, a multi-day, and also recurring events with Amelia.
Did we mention that you can manage multiple locations and that you have Google Calendar integration?
All of these and much more are under only one license, no add-ons are needed.
To test things for yourself, I’d suggest checking out the demos and seeing how things look on the front end as well as in the back end.
Medical/Health online booking page demo

A website of a demo private clinic, where a visitor can read about provided medical procedures and services, and schedule an appointment.
Barbershop booking page demo

A dummy WordPress website for Barbershops with online booking – a nice and easy implementation with the Bridge theme and the Amelia WordPress booking plugin.
Fitness Gym / Yoga booking page demo

A pseudo Yoga/Gym online booking page where you can browse through possible Yoga classes, schedule individual or group training, and book a package of appointments.
Spa/salon booking page demo

A dummy cosmetology website – look through different cosmetic procedures and treatments, pick an employee and schedule appointments.
Consultant booking page demo

A pseudo Business Consultant / Coach / Lawyer website, where a customer can browse through provided consultancy and lawyer services and book an appointment.
Hands down, this is the one you should pick from this list. Yet, you can check out the other options as well to see for yourselves why Amelia is #1.
Creating Events in the Amelia WordPress Booking Plugin
Events created in Amelia can be adapted to the needs of the schedule you are creating. If an event lasts more than one day, for example, or if you are scheduling a conference, you can adjust the calendar accordingly.
You can set up recurring events, like scheduled classes on certain days. In addition, you can assign certain employees to specific events.
To create an event, first go to the events page and select + New Event. You could also select the + button on the bottom right of the page. Once you have done that, a new dialog box will appear.
The first tab, Details, prompts you to put in the information for the event. It asks you to fill in the following information:
- Name the event you are creating. You also have a translation option to provide the event name in several languages.
- Input the dates and time of the event you are creating. As an example, you would input the following information: Dates: 15th June – 15th June, Time: 10 a.m. to 6 p.m.
- If you want to create a repeating event, here is where you will select the recurring option. Once you select This is a recurring event, three new prompts appear: Repeat event, Every and Until when? If the event repeats monthly, you can either select specific dates of the month, or specific days of the week.
- Booking opens and Booking closes. This option allows you to set limits on when customers can book. Your options range from the moment of posting the event until the start of the event and any dates between.
- Apply to all recurring events. If you do not select this box, the plugin will revert to the booking settings of the first event created.
- Maximum allowed spots. Here you can set a maximum capacity for your event. From the front end, the customer will be able to see how many places are still available to book.
- Allow bringing more persons. In this section, you can choose to allow a customer to indicate how many persons they bring with them. This option is automatically checked unless you deselect it.
- Allow customers to book more than once. This option will either allow or prevent a customer from making multiple bookings for the same event. If you select this option, a customer will not be able to make a second booking for the same event. A message will explain that the same email cannot be used to complete multiple bookings and the booking will be canceled.
- Select address. Here you can indicate the location of your event, which will be visible to customers.
- Here you can assign specific employees to an event. Once you assign them, the booking will appear on the employee’s calendar, and they will not be available to accept another booking during that time slot.
- This option can create tags, which will make events easier to find. A customer can select the kind of event they want to see, such as sports events or classes, and the event you have created will appear. If you choose not to include tags, customers will only be able to find events by searching specific dates.
- Include a description of the event you are creating. You can also select a translation option for the description to be viewed in multiple languages.
The next tab you will encounter when creating an event is the Pricing tab. You can select the option to set one general price for the event, or you can create custom pricing with different categories and dates.
The third tab is the Customize tab. Here you can add pictures that will appear with your event. You can also customize the color of the event in your calendar and select if you want the event to appear on the front end of your site.
On the back-end events list, you can view all of your upcoming events. You can view which events are open for booking, which are closed, and if the event is canceled. You can filter events by date, or search for a specific event name.
You can also manage recurring events here, such as conferences, training, or classes. With the Amelia WordPress plugin, you can set how often you want to repeat the event.
On the back end, the Events Calendar Booking View can allow visitors to your site to view upcoming events in the form of a monthly calendar. This way they can see all your upcoming events, select one that interests them, and book it.
If you enjoyed reading this article about the alternative to Divi Events Calendar, you should check out this one with event WordPress themes.
We also wrote about a few related subjects like event ticketing apps, adding an event calendar on a website, discovering the best WordPress calendar plugin, and how to add a calendar to WordPress.
Not only that, but we also created articles about creating tickets for events, setting up recurring events on a WP site, how to sell tickets on WordPress, Elementor event calendar plugins, and creating a church event calendar.
Giving your WordPress Website a calendar events page can be an amazing way to show your event details. It lets your clients stay updated about both future and current events for your company. Most companies mostly have single instance events, while others prefer to use multiple events of a certain style. While both of these styles are fine, often companies miss out on one of the most profitable event types: recurring events.
Whenever an event occurs regularly on specific dates repeatedly, it is a recurring event. These events can be a good way to both save time and make your work easier whenever you manage your calendar in WordPress, but often people don’t make use of them.
People may shy away from the idea of writing out information for an event that happens daily, or even weekly. If you choose to use recurring events though, you can make a singular-instance event that you can repeat automatically on a specific start and end date, and continue that process indefinitely.
Using recurring events can also improve your user’s experience in browsing your calendar. Recurring events can help keep your events in one easy-to-find place, therefore making the booking process a breeze!
What Are Recurring Events?
A recurring event is an event that occurs regularly on repeat, often used for things such as training classes or conferences.
In general, there are two different types of recurring events; one repeats in regular intervals (such as weekly coaching classes) and another that does not follow a set pattern (such as school examinations).
A recurring event can often have many uses similar to an alarm. This is to say that an alarm will always go off at the same time; it will repeat as long as you allow it to. In the same way, WordPress calendars can use recurring events consistently on regular days, weeks, months, or even years. They can even act as alarms for your customers, therefore reminding them of the upcoming events that they have booked.
Before you can add recurring events to your website, you’re going to need to find a suitable plugin for WordPress. We personally recommend using the Amelia events plugin, an easy-to-use plugin that offers flexible recurring events.
Using Amelia, you can select a specific timeframe in which your single or multi-day repeating events can take place.
But many people may not know where to start once the plugin is up and running, so here’s what you need to know to get started making recurring events.
Creating a Recurring Event
Just like making your average single-instance event, you need to first enter the “Events” page. Next, select “+ New Event” or “+” button on the bottom right corner. Then the “New Event” dialog will appear.
After an event has been created, you can set the date or dates of when your recurring event will be held. Next, select “This is a recurring event” to begin the next process.
In this dialog box, select how often you want the event to repeat:
- Daily. Just like an alarm clock, your daily recurring events will repeat without fail. This can prove to be very useful for both event organizers as well as attendees, as even thinking about the pain of RSVPing for that many people can be daunting
- Weekly. Many different types of meetings such as meetups, training sessions, and networking events happen weekly. It can be quite demanding for an event organizer to complete so many frequent events with the same listing every week, so let them take the load off for future events.
- Monthly. Monthly events are quite a common occurrence, and increasing the convenience of such events can greatly assist your company’s productivity. If you select monthly recurring events, you will have the option to either select a day of the month or a day of the week on which you want your event to occur.
- Yearly. Often, yearly events are as special as they are difficult to remember. Creating a recurring event for yearly events can let your event organizers organize once and then forget forever.
You also have even more options for how often your event will repeat within these options, such as every two weeks, three weeks, five months, or even every 10 years. The options are limitless.
Once an event has been set to recur, you will have more options for opening times for booking.
Once you have created your event, the booking options will automatically be set to two settings for simplicity; booking opens immediately, and booking closes when the event starts. If you uncheck these options, you can select other dates and times for start and end dates for booking.
Once you have enabled “Apply this to all recurring events,” you will have these options automatically used for all future events.
If this option is disabled, the plugin will instead calculate a time for both opening and closing based on what time you selected for the first event.
As already mentioned, each event will be considered as separate one-instance events when you check your “Events” page. There you will be able to see a list of events all with a similar event title, but different IDs.
Adding the Booking Form on the Front End
The average form [ameliaevents type=list] will show all the recurring events from today and onward, as well as all events that occur in individual instances.
Here is an example:
You can make an event that spans from Monday to Friday, or one with multiple dates of your choosing. You can think of this as a course with multiple stages within each date. Perhaps your first three events are for basics, the next two are for intermediate points, and the final event is when you complete the course. Each of these events will recur in the future, but not on the same day of the week or month.
If you are using the Elementor Editor, Gutenberg, or Divi, you will have the option to enable “Preselect Booking Parameters.” This option lets you choose if you want your [ameliaevents] booking form to be in the form of a list or calendar.
If you select the 1st event in a recurring list, you will notice that the shortcode also changes to show only this event:
[ameliaevents event=28 type=list]
And the front-end page will now display this single event.
Below the event selection option, you can also enable the “Show recurring events” slider that will show all events from the recurring list.
Also, the shortcode will change to this:
[ameliaevents event=28 recurring=1 type=list]
And this is what the front end would look like:
If you would like to change the price of one specific event, when you select “Save” you will have the option if you want to edit all or some of your events with the following options.
It will ask if you would like to change the price for all scheduled events. If you select “No, just this one,” you will only change the price of the event you are currently editing.
If, instead, you select “Update following,” you can change the price of all events after the event you are editing.
Why Should You Use Recurring Events?
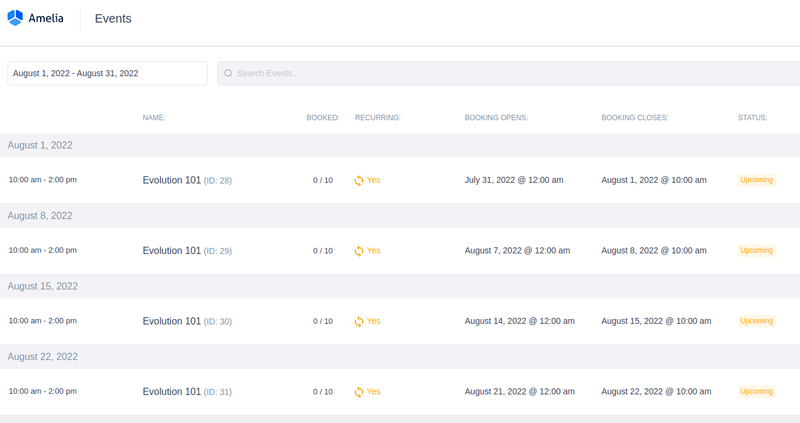
If you choose to use the Recurring Event add-on by Amelia, your job will be much easier. You will be able to repeat your weekly events without all of the time-consuming extra steps. No RSVP, no weekly emails, no waking up early on a Saturday because your event planner was a little proactive. You can plan your events to take place in regular intervals months before they take place, leaving you in full control.
Some people find events much too big a hassle to plan, therefore giving up on them as a whole. Many people even shy away from service business as a whole for this very reason, which is a real shame. Events can be a great way to improve your company’s credibility as well as improve your customer relations. Using Amelia, you can make this usually difficult task easy, as well as productive. So why not give it a try? Leave it up to your website by creating recurring events.
Want to learn more about Amelia? Here’s a small part of what it can do
Amelia is a powerful WordPress booking plugin that works flawlessly with WordPress sites of all kinds. It has a minimal, yet powerful appointment booking interface designed to ease your workflow, automate repetitive tasks, avoid double booking, and make appointment booking a breeze for your customers.
You can even have email notifications and SMS notifications so that nobody forgets about their appointment bookings.
In order to book an appointment, the complete user interaction takes a few clicks with this WordPress plugin. Moreover, with it you can accept payments via PayPal and Stripe, perfect for those who want to pay in advance to book appointments.
As a business owner, you can monitor KPIs in the WordPress dashboard and analyze other important data to keep a pulse on your business. Amelia is a straightforward, no-nonsense booking calendar plugin and an amazing option for those who want an around-the-clock solution for their WordPress site.
Amelia also has an Events Calendar module integrated within its features.
You can now automate your event bookings as well. To be more precise, it means that you will be able to schedule a single day, a multi-day, and also recurring events with Amelia.
Did we mention that you can manage multiple locations and that you have Google Calendar integration?
All of these and much more are under only one license, no add-ons are needed.
To test things for yourself, I’d suggest checking out the demos and seeing how things look on the front end as well as in the back end.
Medical/Health online booking page demo

A website of a demo private clinic, where a visitor can read about provided medical procedures and services, and schedule an appointment.
Barbershop booking page demo

A dummy WordPress website for Barbershops with online booking – a nice and easy implementation with the Bridge theme and the Amelia WordPress booking plugin.
Fitness Gym / Yoga booking page demo

A pseudo Yoga/Gym online booking page where you can browse through possible Yoga classes, schedule individual or group training, and book a package of appointments.
Spa/salon booking page demo

A dummy cosmetology website – look through different cosmetic procedures and treatments, pick an employee and schedule appointments.
Consultant booking page demo

A pseudo Business Consultant / Coach / Lawyer website, where a customer can browse through provided consultancy and lawyer services and book an appointment.
If you enjoyed reading this article about recurring events, you should check out this one with event WordPress themes.
We also wrote about a few related subjects like event ticketing apps, adding an event calendar on a website, how to add a calendar to WordPress, and Divi Events calendar alternatives.
Not only that, but we also created articles about creating tickets for events, how to sell tickets on WordPress, Elementor event calendar plugins, and creating a church event calendar.
Virtual events are not new. For years, many have enjoyed them in different forms. The COVID-19 pandemic has increased their popularity even further.
Likely, you have had a chance to take part in one of them. But if you want to organize them yourself, you need to make sure that you are using the right tools. The right tools will help you to achieve better results and higher attendee satisfaction.
Planning virtual meetings takes a lot of preparation and forethought. You need to think about many things, such as the tools you will use and how to raise money from them. Virtual events calendars can help you to remember every aspect of your event or meeting.
A virtual events calendar is a tool that you can add to your website. It raises awareness and spotlights your events. You can use it to tell your website visitors when and how an event will be held and to provide further details.
Just like the name suggests, a virtual events calendar helps you to organize your online events. It highlights the venues of your events and who is organizing them.
The Benefits of Using a Virtual Events Calendar
Comfort and Easy Access
A virtual event can take different forms, but it is usually a single meeting or a recurring event. They are always held online instead of at a physical location. Virtual events include:
- Live streams on social media
- Zoom meetings
- Conferences that people can watch and rewatch on YouTube
People can join and take part in these events from the comfort of their homes. Many see this as a major advantage for this type of event. You can integrate an IVR system for your virtual events’ setup and registration, thus avoiding the live agents’ guidance in that.
Another advantage of online over in-person meetings is that there is no limit to the number of people that can attend a virtual event, since they suffer no venue-capacity limitations. You can have as many people as you want, and you can bring different kinds of people together in one virtual place.
Help in Organization
Most of us are familiar with at least one of the events mentioned above. We know what they entail and how to join them. If you want to host a successful event, you may want some help in organizing it. Virtual events calendars provide just that.
Showcase Your Website
One added benefit of these event calendars is that they direct the attention of potential clients to your website. Likely, it will also make them more interested in other aspects of your work. This type of outreach is most effective in a group or community.
Adding the calendar to your landing page invites people to visit and explore other sections of the website. Use images and videos to grab the attention of potential attendees. That encourages visitors to attend your online events.
You can also add links to related blogs or an online shop to rouse the interest of your visitors. In the long run, showcasing your website in these ways will increase the traffic to your website.
Expand Your Circle of Friends
You can use the event calendar in other smart ways. You can, for example, ask visitors to register for the event. In that way, you get their contact and other relevant information. You can use the list of attendees to expand your client base.
Highlight Meeting Details
Another benefit of using a virtual events calendar is that you can use it to bring event details to people’s attention. A good WordPress plugin can help you to show past, present, and future events in a logical and attractive way.
There are many WordPress plugins that help you to organize your virtual events calendar. A good recommendation is Amelia. Its installation is very straightforward, and you can make changes to your events from the WordPress dashboard. You will find everything in one place, and you don’t need any coding knowledge to use it.
Add a Virtual Events Calendar to a WordPress Website
Adding a calendar to your website sounds difficult if you have little technical experience. However, the process is very simple if you have the right tools. The Amelia WordPress Events Plugin offers exceptional ease of use. With only a few clicks, you can have a virtual events calendar on your website.
After installing the plugin, you first need to create a new event. Go to the WordPress dashboard, then to the “Events” page, and click the “+” button. A “New Event” dialog box will appear.
Amelia offers a wide range of useful customization options. You can, for example, set up recurring meetings, manage the sale of tickets, and request RSVPing. All these options are part of the free version of the plugin.
In the event details, you can add location information, including Google Maps, as well as a search bar.
As mentioned above, you can use your events for marketing purposes too. Amelia offers integrated marketing solutions. It lets you share event details with a list of people via email. The Elementor Builder is compatible with Amelia’s calendar.
The plugin generates shortcodes. You only need to copy the code and paste it into the right place to add it to your website. The shortcode generator is part of both the paid and free versions.
A Detailed Look at the Options
- Details. These form the basic information needed for creating the event.
- Name. You can create a unique name for each event or meeting. This name will appear on the front-end booking list. This name is modal and thus required.
- Date. You can set the date and the time of the event. The plugin uses these details as part of the scheduling process. You need to set a starting date and time and an end date and time. For a one-day event, you need to fill in the same start and end date.
- Recurring. You can set when and how often you want the same event to repeat. You first need to tick the box “This is a recurring event.” Then you can then specify which event, how often, and how long you want it to repeat.
- Booking opens immediately, and booking closes when the event starts. You can set when you want to open and close booking. You can apply your selection to all the following recurring events.
- Maximum allowed spots. You can determine the capacity for the event. Once all spots are closed, the website calendar changes the event status to closed. People will then no longer be able to register for it.
- Allow bringing more persons. If selected, attendees can sign up for more than one person in the same registration.
- Allow the same customer to book more than once. Amelia leaves this option checked by default. That means that one customer can book more than once for the same event with the same email address.
- Select address. This is the address that people will see in the event list.
- Staff. You can choose to assign one of your employees to the event, although you don’t have to assign someone to each event. You can also assign more than one person to any of the events.
- Tags. You can set up tags for your events. The tag will also show on the website in the events list. This is practical, because it makes the events searchable and filterable. You don’t have to use this option, but it’s useful if you have many events or have similar events.

- Description. You can give any kind of detail that you want your customers to know. The description will also show in the events list. You can, for example, add notes, links, and an agenda.
- Pricing. You will find pricing details on the second tab of the “Options” You can manage event pricing and add payment details. You can use a fixed price or use different pricing categories. You can adjust pricing by the booking date range as well.
- Customize. The third tab contains the following options:
- Event Gallery. You can add pictures. These will appear in the events front-end list.
- Event Colors. You can set a color theme for your event. Viewers will see this in the event list.
- Show event on-site. Select this option when you are ready to publish the event on the virtual calendar on your website.
What Your Clients Will See
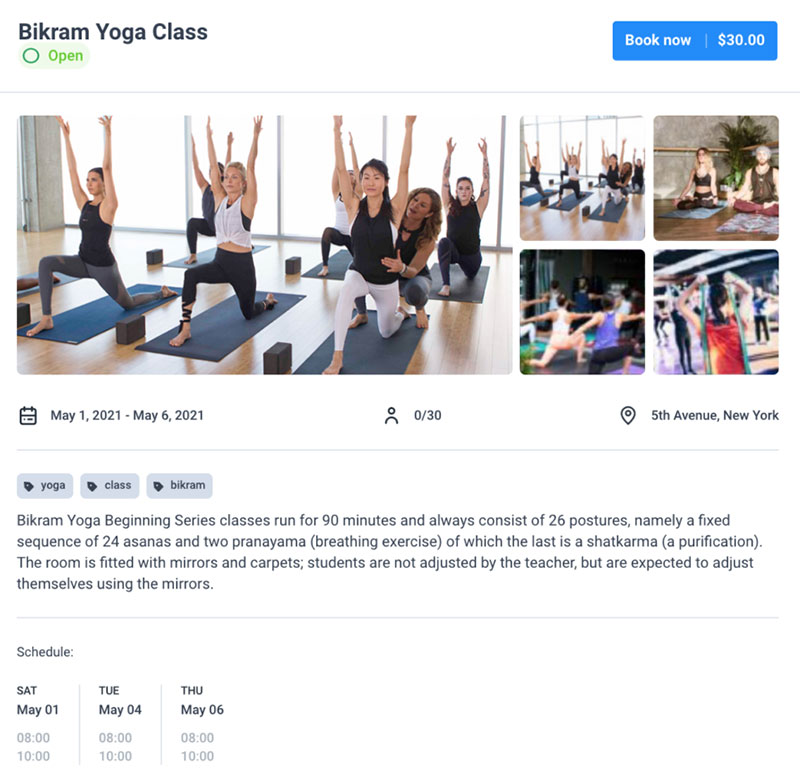
Your website visitors can see the entire calendar. They can see the events for the current month or see an entire list of upcoming events. They can click on the event that takes their interest. After clicking, they will see the event’s details and the option to register for it.
- Name.
- Status. The options include:
- Canceled
- Open for booking
- Closed for booking.
- Gallery. These are the pictures that you have added in the “Customize” By default, users will see the first four pictures. They can click the “+” button to see more pictures.
- Start and end date.
- The number of open spots and capacity.
- Location.
- Tags.
- Description.
- Schedule. This shows all the start and end times of the event.
- Hosts.
If you enjoyed reading this article on adding a virtual events calendar to your site, you should check out this one with virtual event survey questions.
We also wrote about similar topics like event WordPress themes, virtual event best practices, virtual events checklist, and the types of virtual events you can organize.
You have planned an event on your website. You have all the details worked out, and the guest list ready to go. Now you come to the next step: creating tickets for events you have planned. How do you do that?
Since the creation of WordPress plugins, the event industry has undergone a huge transformation. These plugins take care of all the details of event planning, from keeping track of attendance to tracking revenue. Using the right WordPress plugin can help you sell tickets and track information that you can use to better plan your next event. With this information, you can also upsell and cross-sell, which would be extremely difficult if you were to try to do all this manually.
With WordPress plugins, creating tickets for events has never been easier. You can either follow one of the prebuilt templates or create custom tickets according to your specifications. You can fully customize the settings so that the tickets appear right where you want them on your site. You can allow customers to use coupons too.
Advantages of Setting Up an Event Ticketing System Using a WordPress Plugin
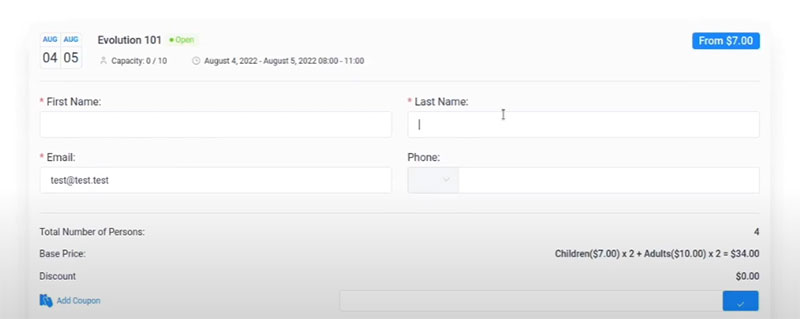
The ticket template solution that already comes with WordPress helps you create an event page on your site. But say you want to promote your event to a larger audience. Are there options for promoting tickets to your event over social media or through advertisers? Yes. As an example, TicketSource gets millions of hits every month from people searching for events.
Plugins designed to create tickets for events accelerate sales and help you connect with attendees. But ticket management plugins have so much more to offer. Below you will find a list of some of the advantages of using ticket-creating plugins.
Streamline event registration
An important part of event registration is ticket sales. You want to know how many tickets you sold and who bought them.
Automate the entire process
Ticket plugins help you streamline the process by automatically sending personalized confirmation emails to your attendees.
Eases guest management
You can manage the total attendance through the plugin. This helps you keep track of how many people attend your event. This will also give you valuable information about your events. For example, it can tell you where you need more crowd management, the busiest areas, and the areas with the best seating.
Offers better communication
Using a plugin to manage your tickets allows you to know who bought tickets, and who canceled them, and send personalized emails accordingly. If someone did not finish registering for the event, you can also send an email prompt to remind them to finish.
Improves customer experience
Having a good system in place for ticket management impresses customers. It helps improve the visitor’s experience. Having the option of interacting freely with you when needed gives them more confidence in you.
Data and insight
Having a well-built ticket-selling plugin gives you valuable information to help you manage and grow your business. It helps you see which events are most popular, which times of day have the most traffic on your ticket-selling page, and more.
How to Create Tickets for Events in WordPress
The following is a guide to using the Amelia events plugin to create event tickets.
You can use this plugin for a variety of events. Whether your event is one day, several days, or recurring, this plugin can adjust to your needs. You can even assign specific employees to work a specific event.
Here is how to create an event using Amelia.
First, go to Events and select + new event. Once the dialog box is open, you will have the option to register the information about your event. The information is sorted into three tabs.
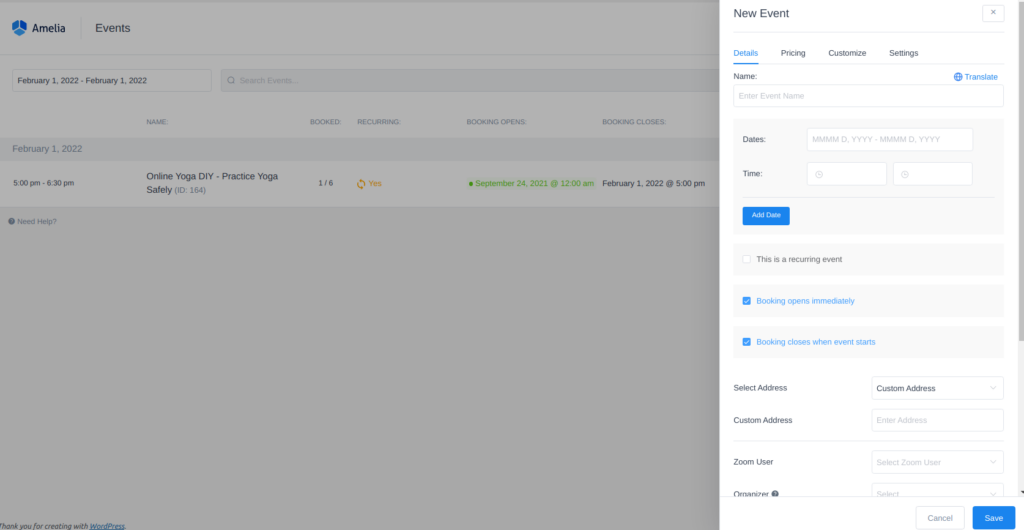
Tab one is called Details. Here you will be able to put in the following information about your event:
- In this box, you can set the name of your event.
- Here you can enter the dates and times for your event, even if it lasts more than one day.
- Select this box if this is a repeating event. If you select this box, you will also be prompted to input Repeat event, Every, and Until when.
- Booking opens immediately and Booking closes when the event starts. This option allows you to set limits on when visitors can book tickets for your event. The options range from the moment of posting to the website up to the time the events start.
- Apply this to all recurring events. If you do not select this box, the settings will revert to the settings of the previous event.
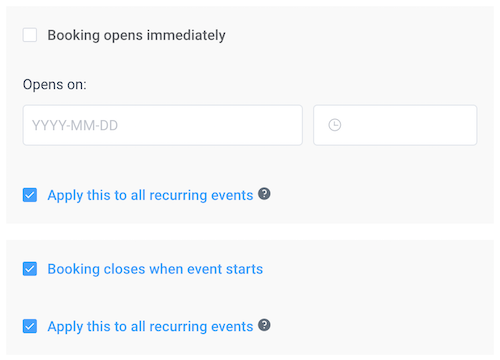
- Maximum allowed spots. Here you can set limits on the number of tickets available. Once all the tickets have been sold, a message will alert all future visitors that the booking is closed.
- Allow bringing more persons. Here you can indicate if the customer is allowed to bring guests with them or not.
- Allow the same customer to book more than once. You can choose to allow the customer to purchase tickets more than once using the same email address.
- Select Address. This option allows you to indicate the location of the event. This will be visible to customers on the front end of your page.
- Assign employees to this event. You can choose to assign multiple employees, or you can skip this step if no employees will be necessary.
- Set up tags to make your event easier for customers to locate. Tags are not necessary, but if you have many events for customers to sort through, it could be useful to create tags. You might set a tag for classes or business events, for example. Then customers can filter their search for the events they are interested in.
- Here you can describe the event you are hosting. This will be shown on the front end, so this is a good place to include any extra details that customers should know about the event.
Pricing is the next tab you will come across when creating an event. This tab allows you to input pricing and payment details for booking a ticket. You can set the prices and disclose deposit information. The Pricing tab allows you a lot of flexibility. One idea is to create custom tickets and prices for VIP customers, another for Regular customers, or Early Birds, and so on.
The third tab is the Customize tab. You can include an event gallery where you upload photos for the event. You can assign the event a certain color in the calendar and indicate if the event will be visible on the public site or only to you and your employees.
Final Words about Creating Tickets for Events
When you are creating tickets for events, Amelia is a great option to meet all your needs. It gives you all the control you need for each step of the process. From creating tickets for events to managing the status of your bookings, the whole process is under your command.
Another great aspect of using Amelia to create tickets is that you don’t need any experience in coding. This plugin supports an abundance of payment options. Buyers have the option of using Amazon Pay, PayPal, Stripe, Square, or Alipay.
The goal is for you to have full control of planning your event. Amelia can help you every step of the way as you customize your best event yet.
If you enjoyed reading this article about creating tickets for events, you should check out this one with event WordPress themes.
We also wrote about a few related subjects like event ticketing apps, adding an event calendar on a website, how to add a calendar to WordPress, and Divi Events calendar alternatives.
Not only that, but we also created articles about setting up recurring events on a WP site, how to sell tickets on WordPress, Elementor event calendar plugins, and creating a church event calendar.


