Welcome to the world of WordPress, the most popular content management system that powers millions of websites worldwide. If you’re not tech-savvy but eager to create your website, you’re in the right place. This beginner’s guide will walk you through the process of installing WordPress, step by step.
We’ll cover everything you need to know, from why WordPress is an excellent choice for beginners to the various installation methods, customization options, and post-installation steps. If you’re looking to establish an online presence, this in-depth guide will provide you with the knowledge and tools to get started with confidence.
Let’s begin!
Jump to
- Preparation Stage: What to Do Before Installing WordPress on Your Website
- Installation Stage: The Four Methods to Install WordPress on a Website
- How to Install WordPress in Your Language
- How to Install a WordPress Multisite Network
- Post-Installation Stage: What to Do After Setting Up WordPress
- Why Is WordPress a Great Choice for Beginners
Preparation Stage: What to Do Before Installing WordPress on Your Website
Before you proceed with installing WordPress, it’s essential to ensure that your web hosting environment meets the necessary requirements and that you have access to the server and the essential tools for a successful installation.
Domain name and hosting
Before you begin, you’ll need a domain name (your website’s address) and web hosting. Consider the domain name carefully, as it’s an essential part of your online identity. Choose a name that reflects your content and is easy to remember. You can register a domain name through various providers like GoDaddy, Namecheap, or directly through your hosting provider.
Your hosting provider is where your website’s files and data will be stored. Make sure to select a hosting provider with a good reputation for reliability, support, and ease of use. Common hosting options include Bluehost, HostGator, SiteGround, WP Engine, or Kinsta. These providers often offer one-click installations for WordPress, making the setup process a breeze.
Requirements on the server side
To run WordPress effectively, your web hosting provider must fulfill specific software and server conditions. Here are the key requirements:
- PHP 7.4 or Greater: WordPress is built on PHP (Hypertext Preprocessor), a programming language. To ensure compatibility, your server should support PHP 7.4 or a higher version.
- MySQL 5.7 or MariaDB 10.4 or greater: MySQL or MariaDB are the database management systems that WordPress uses to store and retrieve data. Your server should run MySQL version 5.7 or MariaDB 10.4, or newer, to function correctly.
- HTTPS Support: For security and improved search engine ranking, your website should be accessible via HTTPS. Most hosting providers offer SSL certificates to enable secure, encrypted connections. It’s crucial to ensure that your server supports HTTPS.
To confirm these requirements and ensure they’re up to date, you can check the official WordPress requirement page.
Requirements on local
If you plan to set up a local testing environment before deploying your site, you’ll need to prepare your local system with the following:
- Login Account (User ID and Password) to the Server via FTP or Shell: To upload files and make changes to your website, you’ll need login credentials to access your server through FTP (File Transfer Protocol) or a command-line shell interface.
- Text Editor: A text editor is necessary for editing the main configuration file and making code customizations. If you’re using Windows, Notepad is a suitable choice, while macOS users can use TextEdit. Later on, you may also want to edit template files, which is much more efficient with a dedicated text editor.
- FTP (File Transfer Protocol): If you’re managing a remote server, an FTP program is essential for uploading, downloading, and managing your WordPress files. FileZilla is a popular choice for FTP tasks.
- Your Web Browser of Choice: Finally, you’ll need a web browser to access your website and the WordPress dashboard and make updates. You can choose your preferred browser for these tasks.
Now that you’ve gathered the necessary tools, checked the server-side requirements, and downloaded the latest version of WordPress from the official website, you’re ready to move on to the installation process.
Installation Stage: The Four Methods to Install WordPress on a Website
When it comes to installing WordPress, you have several options. The method you choose will depend on your hosting provider and your technical preferences.
There are 4 common methods of setting up WordPress:
- Method 1: Choose a hosting provider with pre-installed WordPress
- Method 2: Install WordPress via cPanel and auto installers
- Method 3: Install WordPress manually using FTP
- Method 4: Install WordPress on your local computer
Method 1: Choose a hosting provider with pre-installed WordPress
If you want a hassle-free experience, consider hosting providers that offer pre-installed WordPress. We’ll provide step-by-step instructions for some popular options – HostGator, Kinsta, Bluehost, DreamHost, and SiteGround.
How to install WordPress on HostGator
HostGator is a popular shared WordPress hosting provider known for its user-friendly approach, making it incredibly easy to install WordPress with just a few clicks. If you’re using HostGator as your hosting provider, follow these steps to get WordPress up and running on your website.
Step 1: Get started

- Open Customer Portal Dashboard: After you’ve completed the payment for your hosting package, you’ll be directed to the Customer Portal Dashboard.
- Get Started: In the Customer Portal Dashboard, you’ll spot a ‘Get Started’ button. Give it a click!
Step 2: Your WordPress account is automatically created
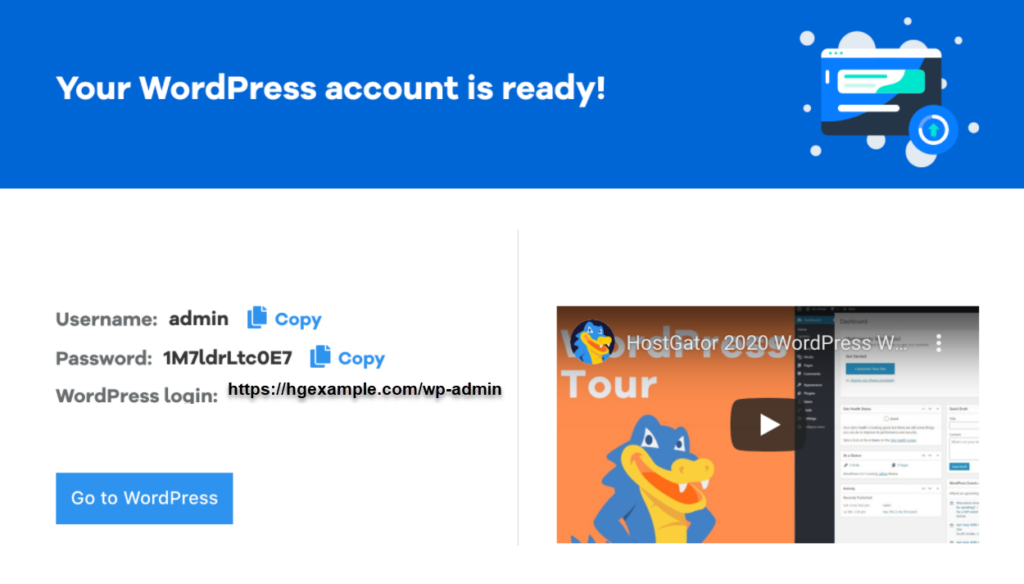
- Account Created: Voilà! Your WordPress account will be automatically created.
- Copy your WordPress Account Details: The next screen will display your WordPress account details. Be sure to make a note of them.
Step 3: Access your WordPress dashboard
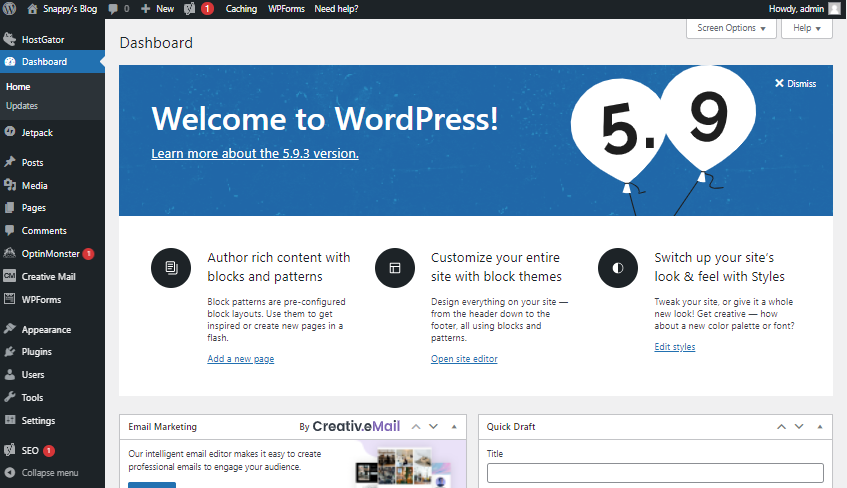
- Visit Your WordPress Website: Click on the ‘Go to WordPress’ button.
- Access Dashboard: Now, you’ll need to enter your WordPress username and password, and just like that, you’ll be inside your WordPress dashboard.
That’s it! You’ve successfully installed WordPress on your HostGator hosting account. You can now begin customizing and building your website using the power of WordPress.
How to install WordPress on Kinsta

Kinsta is a premium managed WordPress hosting provider known for its exceptional speed and top-tier security. Installing WordPress with Kinsta is a seamless process that ensures your website runs efficiently. Follow the steps below to set up WordPress on Kinsta:
Step 1: Sign up for Kinsta
To get started, visit the Kinsta website and choose a hosting plan that suits your needs. Register your domain during the sign-up process.
Step 2: Access your Kinsta dashboard
After successfully signing up for Kinsta, log in to your Kinsta dashboard using your credentials.
Step 3: Add a new WordPress site
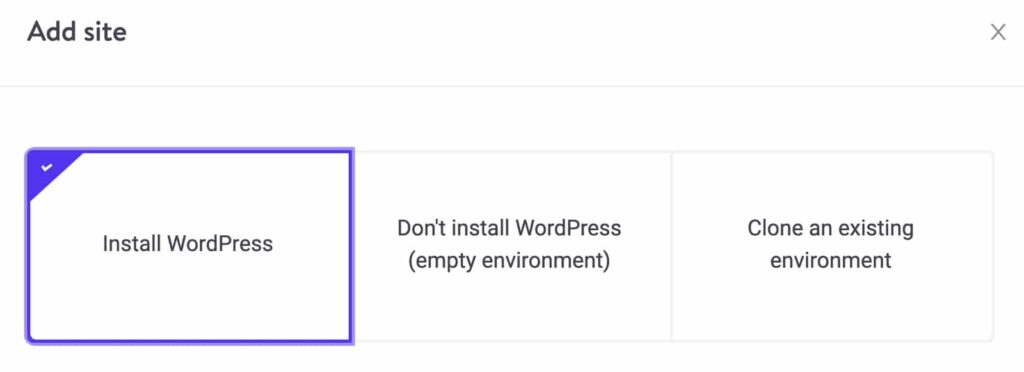
- Go to Your WordPress Sites List: Once inside your Kinsta dashboard, navigate to your WordPress sites list.
- Add a Site: Click on the “Sites” option and then select “Add Site” to start configuring your WordPress site.
Step 4: Configure WordPress installation
Now, you’ll need to go through the WordPress installer tool and fill it out according to your preferences:
- Choose to Install WordPress: On the first screen, select “Install WordPress.”
- Enter an Internal Site Name: Provide an internal site name for your reference.
- Choose Your Data Center: Select your preferred data center location for hosting your WordPress site.
- Enter WordPress Site Details: Fill in your WordPress site title and user credentials as needed.
With these steps completed, Kinsta will proceed to set up your WordPress website with your chosen configurations.
Congratulations! You’ve now successfully installed WordPress on Kinsta, a high-performance managed hosting platform. You can start building your website and enjoy the benefits of Kinsta’s speed and security features.
How to install WordPress on Bluehost
Bluehost is one of the largest and most trusted hosting companies globally, known for its expertise in WordPress and a highly beginner-friendly installation process. They make creating a new WordPress website a breeze, automatically installing WordPress on your domain name when you sign up. In this section, we’ll guide you through the steps to install WordPress on Bluehost.
Step 1: Access your Bluehost dashboard
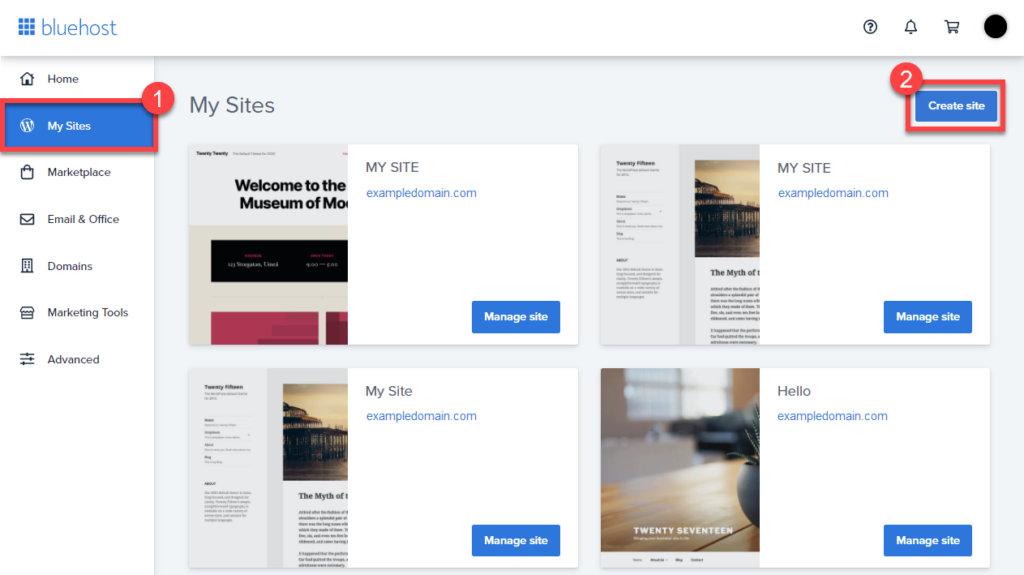
After signing up for a Bluehost hosting account, you’ll gain access to your Bluehost dashboard. To create a new WordPress website, follow these simple steps:
- Click on the ‘My Sites’ Tab: In your Bluehost dashboard, locate the ‘My Sites’ tab and click on it to get started.
- Add a New Site: Within the ‘My Sites’ tab, find the ‘Create Site’ to proceed.
Step 2: Use the Bluehost guided installation wizard
Bluehost offers a user-friendly guided WordPress installation wizard to simplify the process. Follow these steps:
- Start the Installation: New windows appear for two highly recommended website builders. Click the ‘Start Building’ button under the WordPress option.
- Provide Site Title and Tagline: The wizard will ask you to enter a site title and optionally a tagline for your new WordPress website. This title and tagline will represent your site.
- Advanced Tab: After entering the site title and tagline, enter the additional information such as your WordPress admin username and password, as well as your email address.
- Installation Process: The installer will now set up your WordPress site, which may take a few moments. Be patient as it works its magic.
Step 3: Access your WordPress admin area
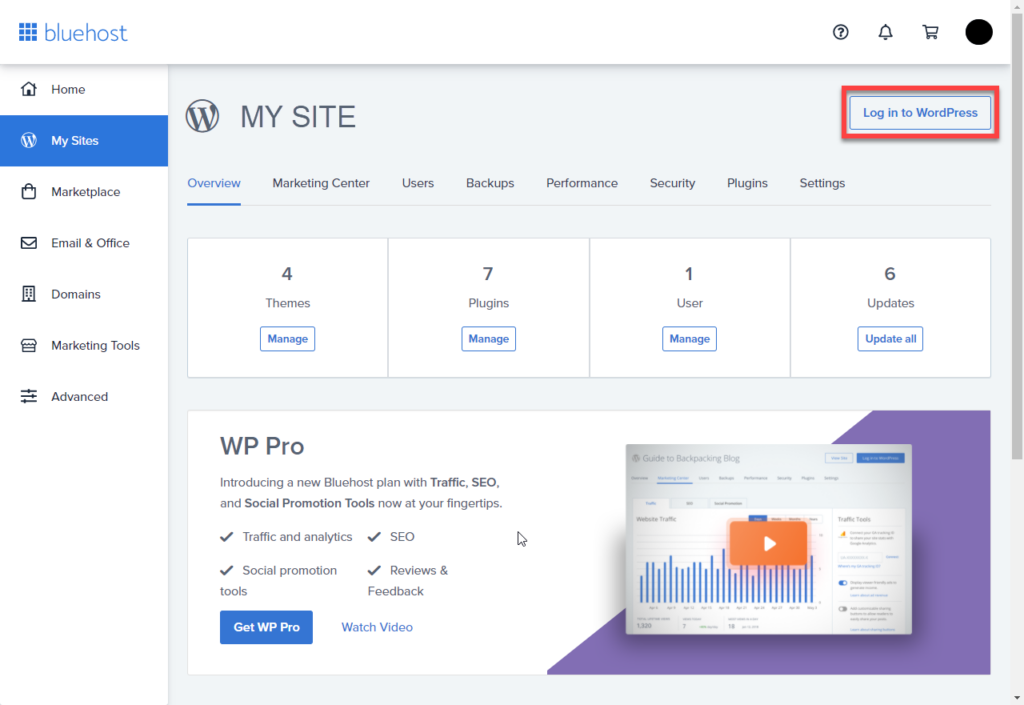
Bluehost will also send the installation details to your email address for reference. To log into your new WordPress website’s admin area, follow these steps:
- Return to the ‘My Sites’ Tab: In your Bluehost dashboard, go back to the ‘My Sites’ tab.
- Manage Your Site: Find your newly created site in the list and click on its ‘Manage site’ button.
- Log into WordPress: Within the site’s management options, you’ll find a ‘Log into WordPress’ button. Click it to access your WordPress admin area.
Congratulations! You’ve successfully installed WordPress on your Bluehost hosting account. You’re now ready to begin customizing and building your website using the power of WordPress.
How to install WordPress on DreamHost
DreamHost provides a user-friendly and straightforward process for installing WordPress on your hosting account. Follow these steps to get WordPress up and running on DreamHost:
Step 1: Navigate to the Install WordPress page
- Log In to Your DreamHost Account: Start by logging in to your DreamHost account.
- Access the Install WordPress Page: Once logged in, navigate to the ‘Install WordPress’ page. You can typically find this option in your DreamHost control panel or dashboard.
Step 2: Install WordPress
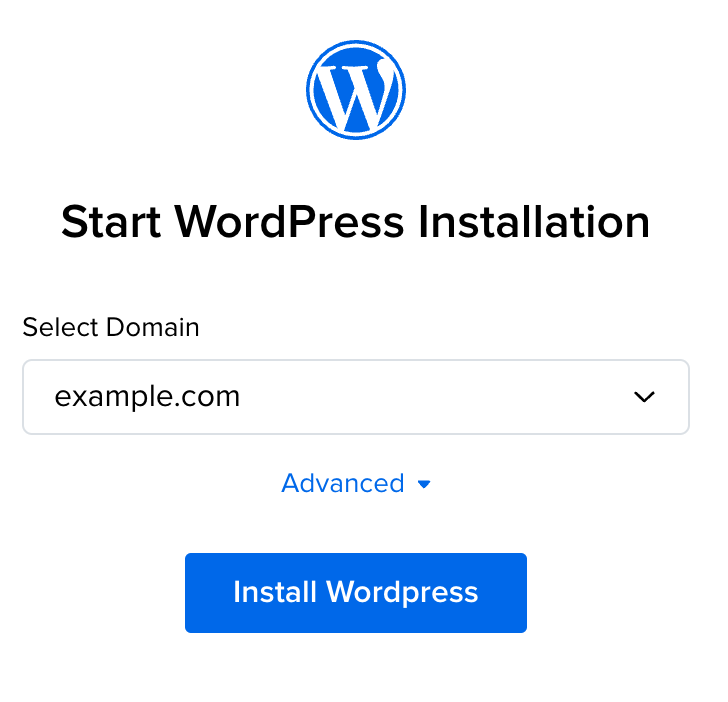
- Select Your Domain: From the provided dropdown, select the domain where you want to install WordPress.
- Install into a Subdirectory (Optional): If you wish to install WordPress into a subdirectory, such as “example.com/blog,” follow these additional steps:
- Click ‘Advanced’.
- Under ‘Specify Path’, enter the subdirectory name where you want to install WordPress.
- It’s recommended to leave the ‘Select Database’ dropdown set to ‘Automatically Create Database’. This will create a new database for your WordPress installation.
- If you prefer to use an existing database that you’ve already created in your DreamHost panel, click ‘Advanced’ and select your database from the ‘Select Database’ dropdown.
- Click ‘Install WordPress’: Once you’ve made your selections, click the ‘Install WordPress’ button to initiate the installation process.
Step 3: Select site purpose and plugins (optional)
- Select a Site Purpose: The next page allows you to choose a site purpose for a guided WordPress install. Select an option that best suits your needs, or choose ‘None’ for a more generic installation.
- Suggested Plugins: Depending on the site purpose you’ve chosen, DreamHost may suggest specific plugins for your installation. You can review these suggestions and decide whether you want to include the suggested plugins. To omit a plugin, simply uncheck the box next to it.
- Click ‘Install’: After making your selections, click the ‘Install’ button to proceed.
Step 4: Complete the installation
Within approximately 15 minutes, you will receive an email at the primary email address associated with your DreamHost account. This email will provide further instructions on completing the WordPress installation.
Step 5: Log into your WordPress site
Once your WordPress installation is complete, follow these steps to log into your WordPress site:
- Check Your Email: You’ll receive an email at the primary email address listed on your DreamHost account with further instructions.
- Access the WordPress Login Page: After completing the installation, you can log into your WordPress site by going to the following URL in your web browser:
example.com/wp-login.php(replace “example.com” with your domain).
That’s it! You’ve successfully installed WordPress on your DreamHost hosting account. You can now log in to your site and start building your website.
How to install WordPress on SiteGround
SiteGround is a popular choice for WordPress beginners, known for its excellent WordPress support and highly optimized hosting plans. They’ve made the WordPress installation process extremely straightforward. Here’s how to get WordPress up and running on SiteGround:
Step 1: Access the SiteGround hosting panel
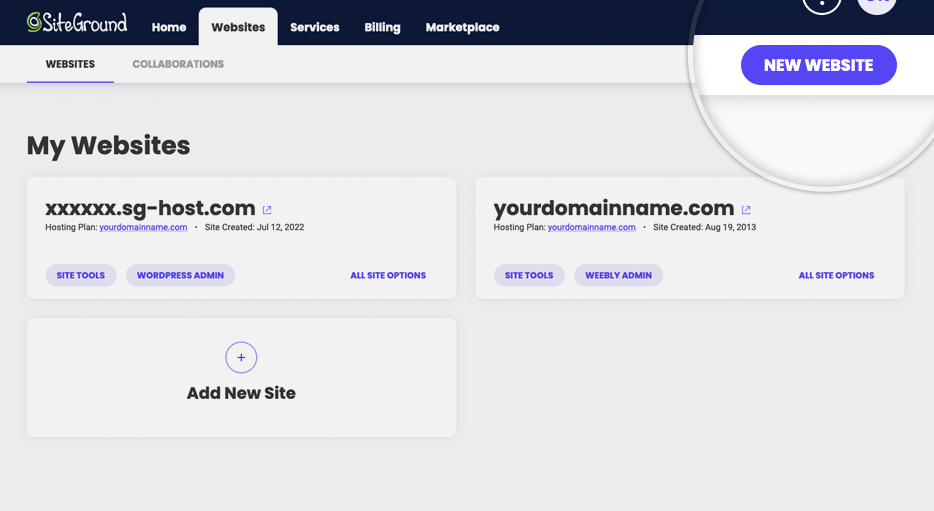
- Log In: Start by logging into your SiteGround hosting panel.
- Navigate to the ‘Websites’ Tab: After logging in, click on the ‘Websites’ tab to begin the WordPress installation process.
- Click ‘New Website’: To create a new WordPress website, click on the ‘New Website’ button.
Step 2: Choose your domain
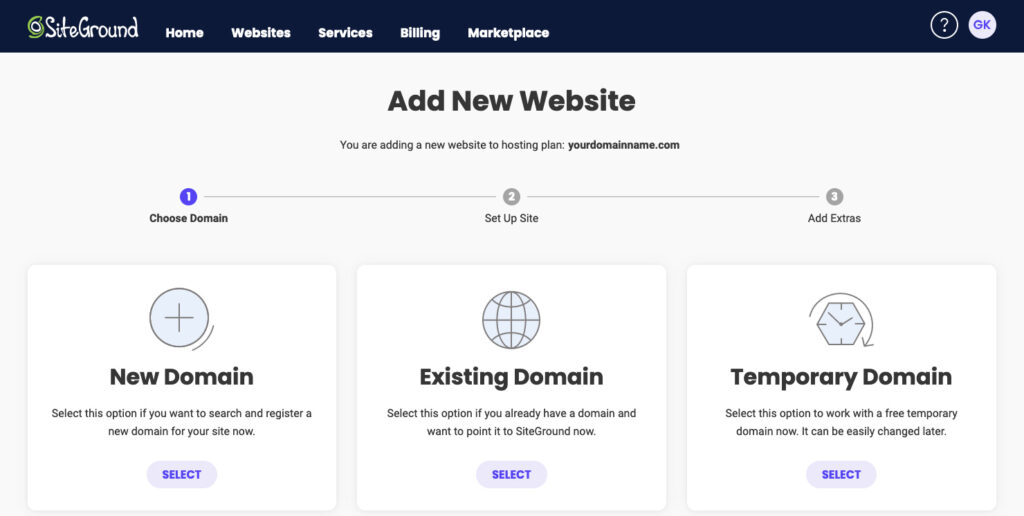
- Select ‘New Domain’ or ‘Existing Domain’: If you already have a domain, choose ‘Existing Domain.’ If you don’t have a domain yet, you can select ‘New Domain’ and search for a domain name you wish to use.
- Enter Your Domain: Type in the domain you want to use for your WordPress website.
- Click ‘Continue’: After entering the domain, click the ‘Continue’ button.
Step 3: Start a new website
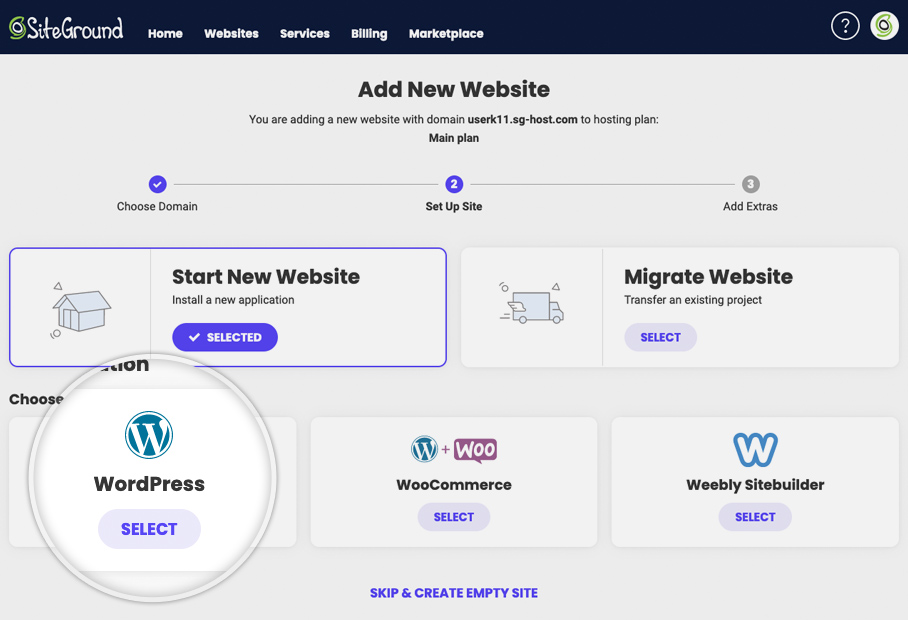
- Select Software: On the next screen, you can choose the software you want to install. Since you want to install WordPress, click on ‘WordPress.’
- Create WordPress Admin Account: After selecting WordPress, you’ll be prompted to enter the email address and password you want to use for your WordPress admin account.
- Click ‘Continue’: Once you’ve filled in the required information, click the ‘Continue’ button.
Step 4: Add extras (optional)
- Select Additional Features: You have the option to add extras to your account. You can skip this step if you prefer. Scroll to the bottom of the screen and click ‘Finish.’
Step 5: Site creation
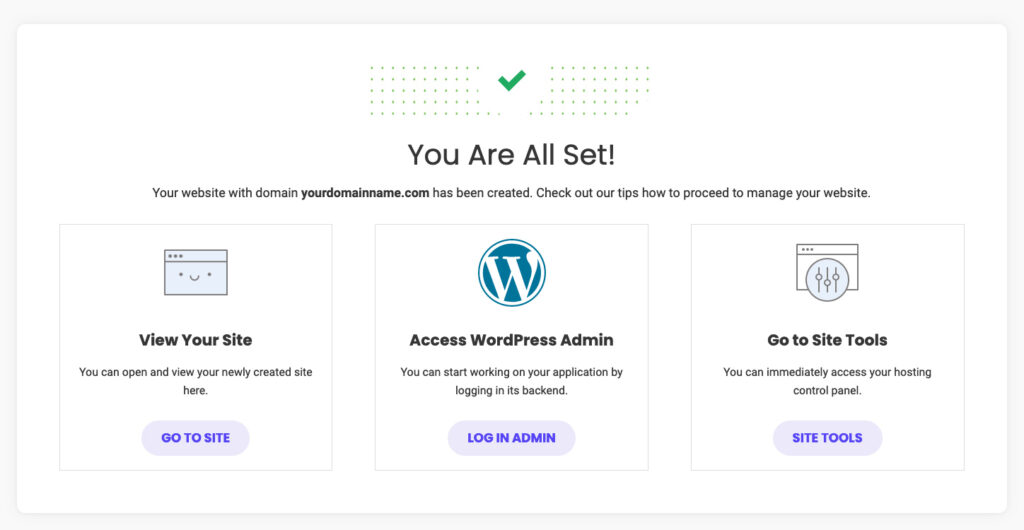
- Create Your Site: SiteGround will proceed to create your WordPress site, which may take a few minutes.
- Log in to WordPress: After the site is created, click the ‘Log in Admin’ button to access the WordPress admin area.
That’s it! You’ve successfully installed WordPress on your SiteGround hosting account and are now ready to start building your website.
Method 2: Install WordPress via cPanel and auto installers
If you’re seeking a more hands-on experience when setting up your WordPress website, installing it through cPanel is a fantastic choice. This method is particularly favored by web developers and individuals with technical backgrounds who crave the ability to fine-tune every aspect of their website’s installation. In essence, it empowers you to tailor the WordPress installation process precisely to your preferences, ensuring that your website is a true reflection of your vision.
cPanel, short for “control panel,” is a user-friendly dashboard provided by many hosting providers upon sign-up. This intuitive interface serves as the command center for managing various aspects of your hosting account. It simplifies tasks related to website management, server settings, and, most importantly, the installation of content management systems like WordPress.
Why choose the cPanel route
The choice to use cPanel for WordPress installation offers several compelling benefits. Here are a few reasons why web developers and technically inclined individuals often opt for this route:
Customization: With cPanel, you have the liberty to customize your WordPress installation to a greater degree. This means you can configure server settings, directories, and other technical aspects of your website, making it ideal for those who want more control.
Technical insight: For those well-versed in web development, cPanel provides insight into the technical side of WordPress installation. You can understand and manipulate server configurations, granting a deeper understanding of the hosting environment.
Versatility: While cPanel interfaces may differ slightly among hosting providers, the fundamentals of WordPress installation remain consistent. This versatility ensures that your skills are transferable, whether you switch hosting providers or manage multiple websites.
Debugging and troubleshooting: Should you encounter technical issues or wish to fine-tune your WordPress setup, cPanel empowers you to troubleshoot effectively, improving the performance and security of your website.
How to install WordPress from cPanel
Here’s a step-by-step guide on how to install WordPress using cPanel and auto-installers:
Step 1: Access your cPanel dashboard
- Log In to Your cPanel: After signing up with your hosting provider, log in to your cPanel using the credentials provided.
- Locate the ‘Auto-Installers’ Section: Inside your cPanel, look for a section labeled ‘auto-installers’. Note that the appearance of cPanel may vary between hosting providers, but the WordPress installation process remains the same.
Step 2: Start the WordPress installation process
- Click on the WordPress Icon: Under the ‘auto-installer’ section, locate and click on the WordPress icon to initiate the installation.
- Click ‘Install Now’: You will be redirected to a page where you can click the ‘Install Now’ button to begin the installation process.
Step 3: Enter installation details
- Provide Domain Name: You’ll be asked to enter the domain name where you want to install WordPress. This step is common in most cPanels and auto-installers.
- Choose Protocol: Under the ‘Protocol’ section, the default option is ‘http’. It’s recommended to stick with this unless you have an SSL certificate installed, in which case you should select ‘https’.
- Directory Option: You’ll be asked if you want to specify a ‘Directory’. In most cases, you should leave this field blank to ensure WordPress is installed on your main domain. Leaving it blank results in a URL like “www.mysite.com.” If you enter a directory, your URL will look like “www.mysite.com/blog,” meaning WordPress will only be installed on a portion of your site.
- Site Settings: You can also enter your website’s name (business name) and description (purpose of your website) under ‘Site Settings’. These details can be updated later if needed.
Step 4: Set up your admin information
- Complete Admin Page Information: Enter your admin username, password, email address, and any additional information required. The number of questions may vary based on the auto-installer you’ve chosen.
- Click ‘Install’: After providing the necessary details, click the ‘Install’ button to proceed.
Step 5: Access your WordPress admin area
You should now have access to the WordPress admin area by visiting “www.mysite.com/wp-admin” where “mysite.com” represents your domain. This is where you can manage and customize your WordPress website.
That’s it! You’ve successfully installed WordPress through cPanel and auto-installers, giving you control over the installation process and access to your WordPress website’s backend.
Method 3: Install WordPress manually using FTP
For those who prefer a more hands-on approach, you can manually install WordPress using FTP (File Transfer Protocol). This method (also known as the 5-minute install method) gives you full control over your installation. Here are the steps:
- Download WordPress: Visit the official WordPress website (wordpress.org) and download the latest version of WordPress.
- Extract the Files: Unzip the downloaded WordPress files to a folder on your computer.
- Upload the Files: Use an FTP client (e.g., FileZilla) to connect to your hosting account. Upload the entire WordPress folder to your web server.
- Create a Database: Log in to your hosting account and create a new MySQL database and user with the necessary permissions.
- Run the Installation: Open a web browser and go to your domain (e.g., www.yourwebsite.com). You’ll receive WordPress installation instructions and the first thing WordPress will request is your database name, password, and MySQL host information. Fill in the database information and click ‘Run the Install’ to initiate the process. You’ll be prompted to provide essential information for your website setup, including the site title, username, password, and admin email address. As soon as you fill the information in, WordPress will finalize the setup and you’ll see a success message written on the screen.
Method 4: Install WordPress on your local computer
If you want to experiment before going live, you can install WordPress on your local computer. This creates a safe testing environment where you can learn and experiment without affecting your live website. Here’s how to do it:
- Choose a Local Server Environment: Download and install a local server environment like XAMPP, MAMP, or WampServer on your computer.
- Download WordPress: Visit wordpress.org and download the latest version of WordPress.
- Set Up a Database: Create a database in your local server environment.
- Install WordPress: Follow the manual installation process as described earlier, but this time, you’ll configure it for your local environment. You can access your local site by going to http://localhost/yourwebsite.
How to Install WordPress in Your Language
WordPress is available in numerous languages, making it accessible to a global audience. We’ll show you how to install and use WordPress in your preferred language, ensuring that your website’s interface is comfortable for you.
- Access Your WordPress Dashboard: After installing WordPress, log in to your admin dashboard.
- Go to Settings: In the left-hand menu, click on ‘Settings’, then ‘General’.
- Select Your Language: Scroll down to the ‘Site Language’ option and choose your preferred language from the dropdown menu.
- Save Changes: Don’t forget to save your changes, and your WordPress interface will now be in your selected language.
How to Install a WordPress Multisite Network
If you plan to manage multiple WordPress websites under one roof, we’ll explain how to set up a WordPress Multisite network. This feature is perfect for businesses, organizations, or individuals looking to streamline their website management.
- Back Up Your Current Website: Before proceeding, make sure to back up your existing WordPress website, as creating a multisite network involves significant changes.
- Access Your wp-config.php File: Using an FTP client, access your website’s root directory and locate the wp-config.php file.
- Edit the wp-config.php File: Open the wp-config.php file and add the following line of code just before the line that says “That’s all, stop editing!”
define('WP_ALLOW_MULTISITE', true);
- Save and Upload: Save the wp-config.php file and upload it back to your server.
- Access Your Dashboard: Log in to your WordPress dashboard.
- Navigate to Network Setup: In the admin sidebar, click on ‘Tools’ and select ‘Network Setup’.
- Choose Subdomain or Subdirectory: Decide whether you want to create subdomains (e.g., site1.yourwebsite.com) or subdirectories (e.g., yourwebsite.com/site1) for your network.
- Fill Out Network Details: Provide network details, including the network title and your email address.
- Install the Network: Click the ‘Install’ button and follow the provided instructions to enable the multisite network.
- Add New Sites: After installation, you can add new sites to your network from the ‘Sites’ menu in your dashboard.
Amelia: The Ultimate Booking Solution for Your WordPress Site
When it comes to turning your WordPress website into a booking powerhouse, there’s one name that shines above the rest: Amelia.
Amelia isn’t just another scheduling tool; it’s a game-changer for service-based businesses, especially if you’re looking for an appointment booking solution that seamlessly integrates with your WordPress website.
Why is Amelia the perfect choice for your WordPress-powered website?
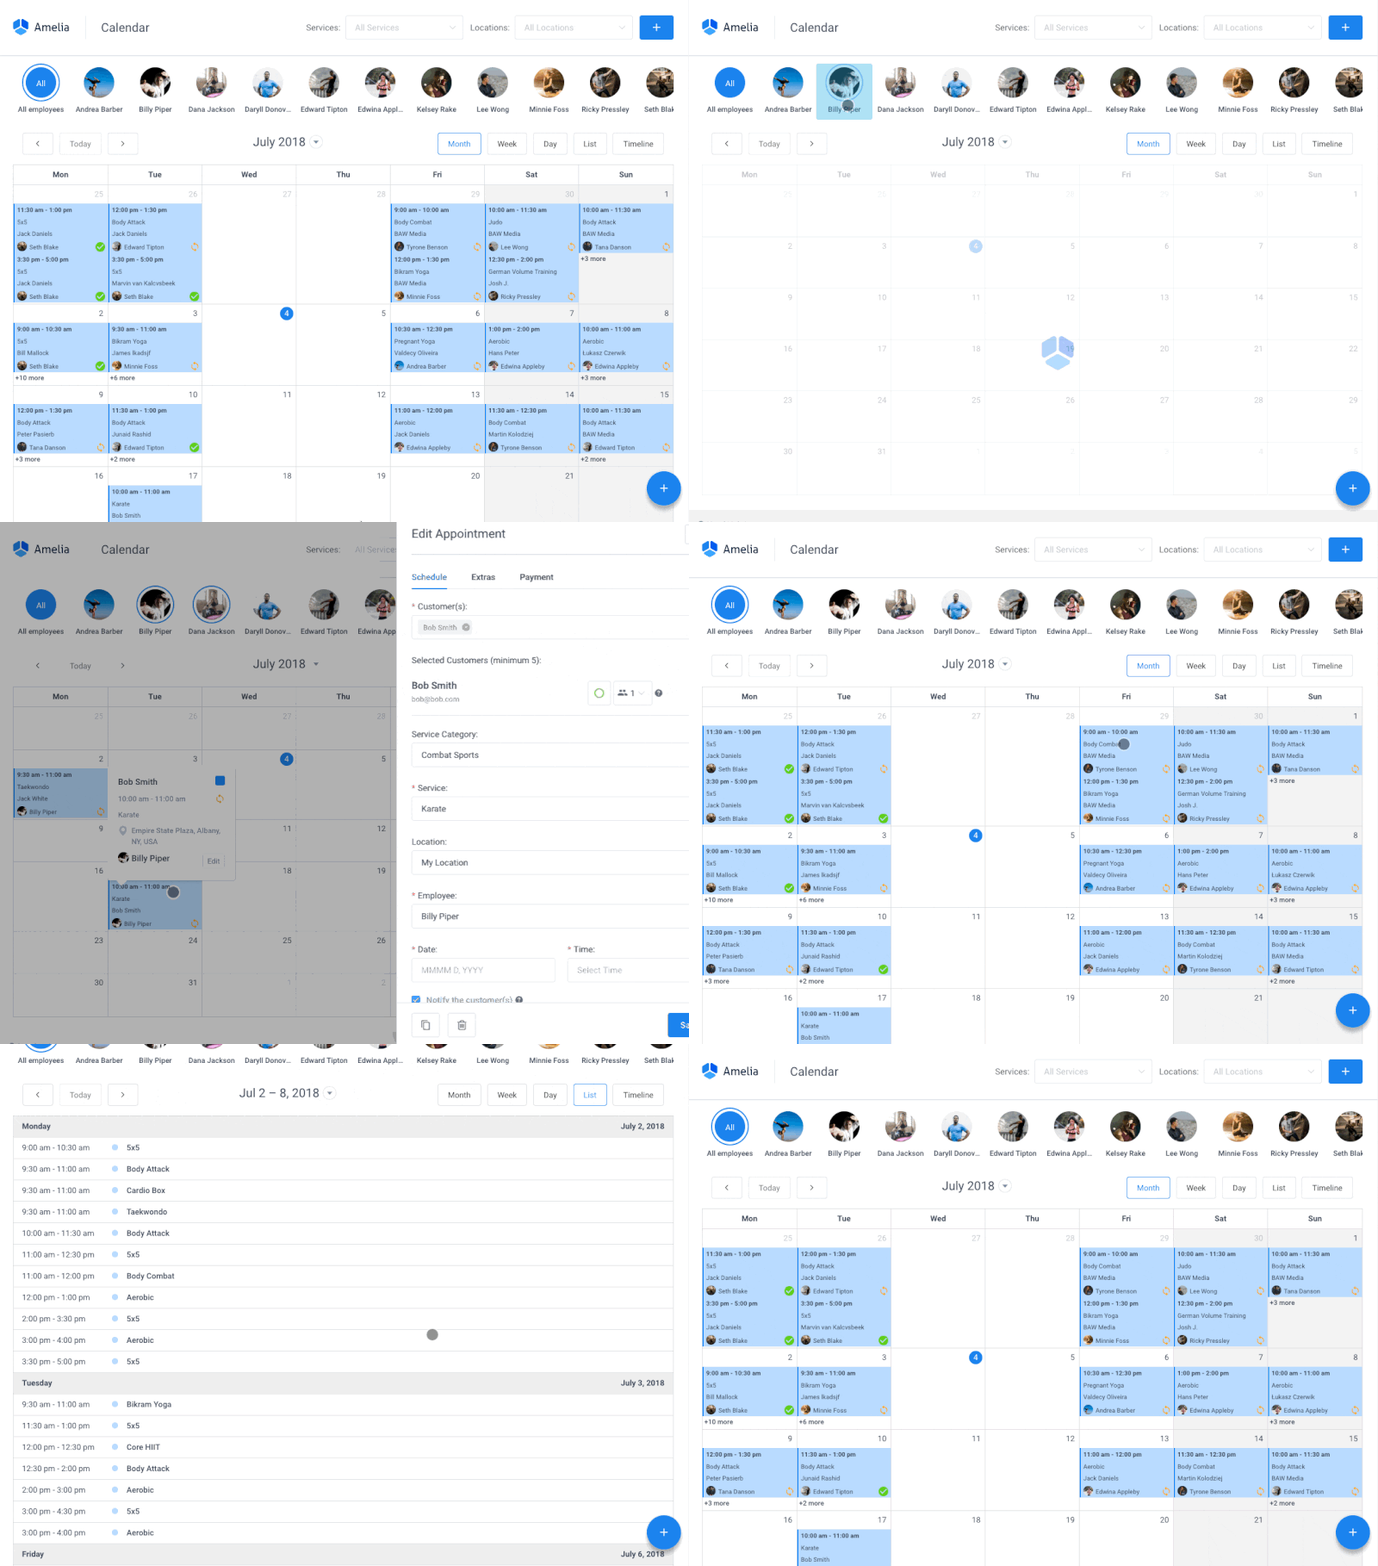
📅 Effortless Appointment Management: With Amelia, you can say goodbye to the hassle of manual appointment scheduling. Clients can check availability and book appointments in a few clicks.
🛍️ Online Payments: Streamline your payment process with integrated payment gateways. Allow clients to pay securely online, enhancing their convenience.
📩 Automated Notifications: Reduce no-shows and keep everyone informed with automated email and SMS notifications for upcoming appointments.
📊 Detailed Reporting: Gain valuable insights into your business’s performance with comprehensive reporting and analytics tools.
🎨 Customizable Design: Seamlessly integrate Amelia into your website’s design, ensuring it aligns with your brand’s identity.
🔒 Data Security: Rest easy with robust data security measures that protect your clients’ sensitive information.
So, if your WordPress website needs booking capabilities, Amelia is the unbeatable choice. It not only saves you time and effort but also enhances your clients’ experience. Visit our demo page and see for yourself what this feature-packed plugin is capable of.
With Amelia, your WordPress site becomes the go-to destination for seamless bookings, and your business thrives as a result. Say goodbye to manual scheduling headaches and hello to an efficient, modern booking experience.
Amelia is the missing piece that completes your WordPress website, so choose it today and start soaring!
Post-Installation Stage: What to Do After Setting Up WordPress
Congratulations! You’ve successfully installed WordPress. Now, what’s next? In this section, we’ll cover essential post-installation steps:
Choosing a theme
Selecting a theme that aligns with your website’s purpose and aesthetic is crucial. WordPress offers a wide range of free and premium themes to choose from. Here’s how to do it:
- Access Your Dashboard: Log in to your WordPress admin dashboard.
- Go to Appearance: In the left-hand menu, click on “Appearance,” then “Themes.”
- Browse and Install: Browse the available themes and click “Install” to add a theme to your collection.
- Activate Your Theme: After installation, click “Activate” to set your chosen theme as the active design for your website.
Customizing your website
Personalize your website by customizing your chosen theme. This includes configuring colors, fonts, and layout settings to make your site unique. Here’s how:
- Access the Customizer: From your dashboard, go to ‘Appearance’ and select ‘Customize’.
- Explore Theme Options: Inside the Customizer, you’ll find options specific to your theme. These may include settings for colors, typography, header and footer layouts, and more.
- Make Your Changes: Adjust the settings to your liking, previewing the changes in real-time.
- Save Your Customizations: Once satisfied with the changes, click “Publish” to save your customizations.
Adding essential plugins
Enhance your website’s functionality by installing essential WordPress plugins. These can include appointment scheduling plugins, security plugins, SEO tools, and contact forms to engage your audience. Here’s how to add a plugin:
- Access Your Dashboard: Log in to your WordPress admin dashboard.
- Go to Plugins: In the left-hand menu, click on ‘Plugins’, then ‘Add New’.
- Search for a Plugin: Use the search bar to find a specific plugin or browse featured and popular plugins.
- Install and Activate: Click ‘Install’ to add a plugin, and then click ‘Activate’ to activate it on your site.
- Configure the Plugin: Depending on the plugin, you may need to configure settings to suit your needs. These settings can usually be found under the ‘Settings’ tab within your WordPress dashboard.
With the right selection of plugins and proper configuration, you can significantly expand the capabilities of your WordPress site and provide a better experience for both your visitors and yourself. Whether it’s optimizing your site for search engines, enhancing security, or adding interactive forms for user engagement, plugins play a crucial role in shaping your website’s performance and functionality.
Why Is WordPress a Great Choice for Beginners?
The user-friendly choice
WordPress is renowned for its user-friendly interface, making it accessible for beginners and seasoned users alike. You don’t need to be a tech expert to create and manage your website. The dashboard is intuitive and designed with simplicity in mind. Even if you’re new to website building, you’ll quickly find your way around.
Highly customizable
One of the key advantages of WordPress is its flexibility. You can customize your website’s appearance, functionality, and features by choosing from thousands of themes and plugins. Whether you’re creating a personal blog, a portfolio website, or an online store, you’ll find a theme that suits your style.
A world of themes and plugins
WordPress offers an extensive library of themes and plugins. Themes control the look and feel of your website, while plugins add specific features. This variety ensures your website is tailored to your unique needs. Want to sell products? There are e-commerce plugins. Looking to create an online booking system? Booking plugins are there to help you get more bookings. Need to optimize your site for search engines? SEO plugins have you covered. WordPress’s vast community means you’ll always find the right tool for the job.
Final Thoughts on Setting Up WordPress on Your Website
In this comprehensive guide, we’ve walked you through various methods for installing WordPress, the world’s most popular content management system. Whether you’re a beginner looking to create your first website or a seasoned developer seeking a flexible and feature-rich platform, WordPress offers the versatility and user-friendliness to meet your needs.
We discussed several installation methods, catering to different preferences and technical backgrounds. You can choose to install WordPress with one-click solutions offered by hosting providers, manually upload the files to your server, or even set up a local development environment for testing. The choice is yours, and we’ve covered each method in detail.
To unlock the full potential of WordPress, explore the vast world of themes, plugins, and content creation strategies. Regular updates and maintenance are your keys to a secure and high-performing site.
And remember- WordPress isn’t just for today; it’s shaping the future of web development.
Looking for More WordPress Guides and Tutorials?
Make sure to check out these valuable resources to enhance your WordPress journey:
- Is WordPress Free? Demystifying WordPress Pricing
- How to Reset Your WordPress Site: An In-Depth Guide
- How to Delete a WordPress Site: A Step-By-Step Guide
- WordPress User Roles Explained: Everything You Wanted to Know
- The Best Local WordPress Development Environments in 2023
- Discover 10 Best Plugins for WordPress in 2023 (Expert Picks)
- How to Back Up Your WordPress Site: The Ultimate Guide
FAQ on How to Install WordPress
1. How do I install WordPress on my computer?
To install WordPress on your computer for testing or development purposes, you can set up a local server environment using software like XAMPP, WAMP, or MAMP. After creating the server, download the latest version of WordPress from the official website, and follow the installation instructions. This allows you to work on your website locally before publishing it online.
2. How do I install WordPress for the first time?
Installing WordPress for the first time on a web hosting server is typically done through your hosting provider’s control panel (e.g., cPanel). You can use auto-installers or manually upload the WordPress files to your server. Follow the step-by-step instructions provided in this article to guide you through the process.
3. Can you install WordPress for free?
Yes, you can install WordPress for free. The WordPress software itself is open-source and free to download and use. However, you may need to pay for web hosting, a domain name, and premium themes or plugins, depending on your website’s specific needs.
4. Do I have to download WordPress.org to use it?
No, you don’t need to download WordPress from WordPress.org to use it. When you install WordPress on a web hosting server, your hosting provider often offers one-click installations or automated setup. You can install it directly from your hosting account without manually downloading the software.
5. Can I install WordPress manually?
Yes, you can install WordPress manually if you prefer more control over the installation process. Manual installation involves uploading WordPress files to your server, creating a database, and configuring settings. This method is commonly used by experienced users and developers.
6. Is it safe to download WordPress?
Yes, downloading WordPress from the official website, WordPress.org, is safe. The platform is open-source and maintained by a dedicated community of developers. However, to ensure security, always download WordPress and its themes and plugins from reputable sources, and keep your installations up to date to protect against vulnerabilities.
7. Is WordPress still relevant in 2023?
Yes, WordPress remains highly relevant in 2023. It continues to power a significant portion of websites on the internet, from personal blogs to large-scale business sites. Its flexibility, user-friendly interface, and extensive plugin ecosystem make it a top choice for website development.
8. Do all websites use WordPress?
No, not all websites use WordPress. While WordPress is popular, there are various other content management systems and website-building platforms available. The choice of platform depends on the specific needs and preferences of website owners. WordPress is favored for its versatility, but the selection of the right platform depends on individual requirements and goals.

