WordPress, known for its user-friendly interface and flexibility, lets site owners manage user access through a system of roles and capabilities. Understanding WordPress user roles is crucial for effective site administration, as they determine the level of access and control users have within the platform.
Moreover, WordPress user roles and their management are key for keeping a site secure, organized, and efficient. They set the rules for who can do what in WordPress. Whether it’s the all-powerful administrators or those with limited access like subscribers, each role has a specific job in running the site.
In this detailed guide, we’ll explore WordPress user roles inside out: what they do, how to create custom ones, and how to manage who can do what on your site.
Let’s dive in!
Jump to
- What Are WordPress User Roles?
- Benefits of WordPress User Roles
- The Six Default WordPress User Roles
- Default vs. Custom User Roles
- How to Assign a User Role in WordPress
- How to Customize Existing User Roles in WordPress
- How to Delete a User Role in WordPress
- How to Create Custom WordPress User Roles
- How to Manage WordPress User Roles and Capabilities Effectively
- Efficient User Management in WordPress Multisite
- WordPress User Roles Plugins
What Are WordPress User Roles?
WordPress user roles define the level of access and permissions granted to individuals or groups on a WordPress site. These roles determine what users can do within the site’s backend and its various functionalities.
Each role comes with a set of capabilities that specify the actions a user can perform. Understanding these roles is fundamental for effective site management and security and should be one of your top priorities as soon as you install your WordPress website.
What are WordPress capabilities?
WordPress capabilities cover a wide range of tasks users can do in the site’s backend. These actions are categorized into various types, such as:
- Core Capabilities: Fundamental actions related to content management, user management, and site settings.
- Post Type Capabilities: Specific actions related to handling different content types (posts, pages, custom post types).
- Meta Capabilities: Granular actions like editing one’s posts, moderating comments, or managing others’ content.
The relationship between roles and capabilities determines what each role can and cannot do. For instance:
- Administrator: This role holds all capabilities, which makes it the most powerful role with full control over the site.
- Editor: Has capabilities like editing, publishing, and deleting any post type.
- Author: Can create and publish their own posts but cannot modify others’ content.
- Contributor: Can write and manage their posts but needs editor approval for publishing.
- Subscriber: Has minimal capabilities, usually limited to reading content and managing their profile.
Benefits of WordPress User Roles
WordPress user roles offer several advantages, such as:
1. Enhanced security and access control
WordPress user roles are crucial for site security, as they implement a structured access control system. This granular control ensures that each user has access only to the necessary features and functionalities required for their role.
Limiting access to critical areas such as theme and plugin management or user settings significantly reduces the chance of unauthorized changes or security breaches.
In addition, restricting access to critical functionalities reduces the chances of accidental changes that could affect the site’s performance or security. Implementing antivirus software further fortifies your site’s defenses, providing an additional layer of protection against malware and cyber threats
2. Efficient workflow management
Defined user roles streamline workflow management by assigning specific responsibilities to different users. This means that each role has a defined set of tasks and permissions, allowing team members to focus on their designated responsibilities without confusion.
Roles like authors, editors, and contributors facilitate a structured content creation pipeline, from drafting to editing and publishing, maintaining content quality and consistency.
3. Team collaboration and productivity
WordPress user roles promote collaboration among teams by enabling task distribution. Different roles facilitate teamwork by allowing individuals to contribute according to their expertise without interfering with other areas.
Also, assigning roles ensures that each team member is responsible for specific tasks, promoting accountability and productivity.
4. Scalability and growth
As a website grows and teams expand, user roles offer scalability benefits.
With predefined roles, onboarding new team members becomes more straightforward. And assigning appropriate roles grants them the necessary access and permissions without compromising site security.
What’s more, user roles can be adjusted as the site evolves, accommodating changes in team structure or workflow requirements without disrupting existing processes.
The Six Default WordPress User Roles
1. Administrators
Administrators possess the most extensive capabilities, enabling them to control every aspect of the WordPress site. They can create, delete, and manage user accounts, install or delete plugins and themes, moderate comments, manage settings, and more.
Administrators are typically site owners or managers responsible for overseeing the entire website. They are the ones who ensure its smooth operation, security, and functionality.
2. Editors
Editors have significant content management capabilities, such as the authority to publish, edit, or delete any posts or pages. They can moderate comments and manage categories and tags.
Editors focus on maintaining content quality, editing, and curating content submitted by authors. They ensure that the published content aligns with the site’s standards and objectives.
3. Authors
Authors have the ability to create, edit, publish, and delete their own posts. They can work independently on their content.
They are primarily responsible for generating original content, such as articles, blog posts, or other materials, as well as publishing them on the site.
4. Contributors
Contributors can create and manage their posts but lack the permission to publish them. Instead, they submit their work for review by higher roles.
Contributors focus on content creation and submission. Basically, they draft content and await approval from editors or administrators before publication.
5. Subscribers
Subscribers have limited capabilities, primarily focused on managing their profiles and interacting with the site by leaving comments and accessing restricted content.
They often engage with the site by signing up for newsletters, managing their profile information, as well as participating in discussions through comments.
6. Super Admin (Multisite Installations)
Super Admins are specific to WordPress multisite installations and hold control over the entire network of sites. They can create and manage individual sites within the network and have control over user roles across the network.
In multisite environments, Super Admins oversee the entire network, managing site configurations and user roles, and ensuring the network’s functionality and security.
Default vs. Custom User Roles
WordPress comes with default user roles designed for different site responsibilities. Sometimes, these default roles don’t match a site’s needs or team setups exactly. In such cases, the creation of custom user roles becomes crucial.
Default WordPress user roles arrive with pre-established sets of capabilities tailored to distinct responsibilities. These roles are designed to cover general use cases, facilitating immediate assignment without the need for additional configuration. However, their predefined nature might limit their suitability for unique site needs or specialized team roles.
In contrast, custom WordPress user roles empower site administrators by offering tailored capabilities aligned with precise necessities. These roles provide flexible access control, allowing administrators to fine-tune permissions meticulously. This level of granularity ensures that users possess only the necessary capabilities for their designated roles, which creates a more secure and structured environment.
One of the significant advantages of custom user roles lies in their adaptability. These roles evolve alongside the site’s growth or changing dynamics within the team structure. As new responsibilities emerge or workflows undergo alterations, custom roles can be adjusted or expanded to accommodate these changes seamlessly.
How to Assign a User Role in WordPress
Method 1: Using the WordPress Dashboard
1. Log in to Your WordPress Admin Dashboard: Access the backend of your WordPress site using your admin credentials.
2. Navigate to the Users Section: In the WordPress dashboard, click on the “Users” option in the left-hand menu.
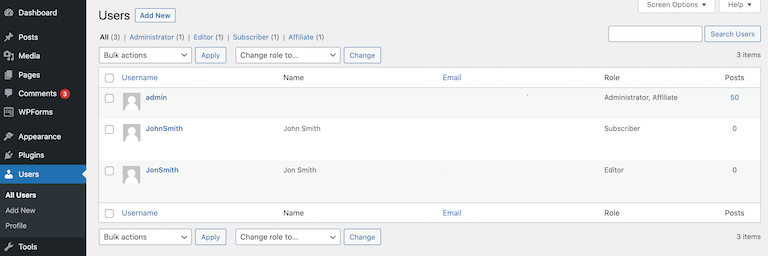
3. View All Users: Next, click on “All Users” to display a list of all registered users on your WordPress site.
4. Select a User Account: Identify the desired user account and hover over their username until you see the Edit link. Click on it.
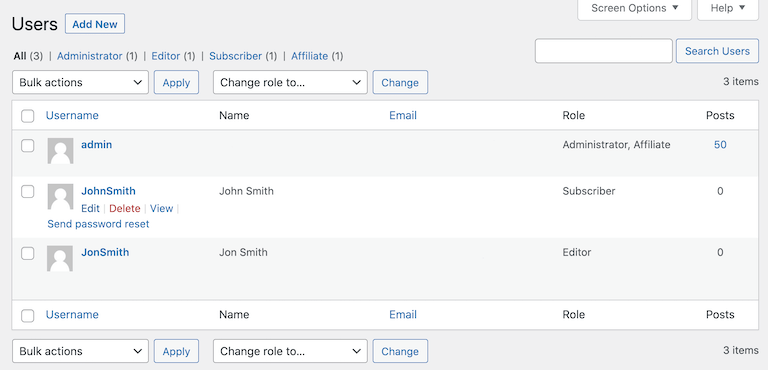
5. Edit User Profile: You’ll now be directed to the user’s profile page, displaying various settings and user information.
6. Locate the Role Setting: Look for the “Role” or “Role/Status” section on the user’s profile page.
7. Choose a New Role: From the dropdown menu in the Role section, select the desired user role you wish to assign to the user. The available roles will vary based on the roles set up on your WordPress site.
8. Update User Profile: Finally, after selecting the new role, scroll down to the bottom of the page and click the “Update User” or “Save Changes” button to save the changes made to the user’s profile.
Pro tip: In case you want to change a user’s role by assigning them a different role simply go to “All Users” and check the box next to the name of a user whose role you wish to change.
Next, from the dropdown menu in the Change role to… section, select the desired user role you wish to assign to the user. The available roles will vary based on the roles set up on your WordPress site.
After selecting the new role, simply click the “Change” button to save the changes made to the user’s profile.
Method 2: During user registration
1. Access General Settings: First, in the WordPress dashboard, go to “Settings” and click on “General.”
2. Set Default Role: Under the General Settings, find the option labeled “New User Default Role.”

3. Select Default Role: From the dropdown menu next to “New User Default Role,” choose the default user role you want to assign to newly registered users.
4. Save Changes: Finally, scroll down to the bottom of the page and click the “Save Changes” button to apply the new default role for future user registrations.
Pro tip: WordPress follows a hierarchical structure for roles, where higher-level roles encompass the capabilities of lower-level roles. Ensure you assign roles according to the user’s responsibilities and required access levels. In addition, double-check the assigned role’s capabilities to guarantee that the user has the necessary permissions for their tasks without unnecessary access.
By following these steps, WordPress administrators can easily assign specific user roles to individuals, effectively managing access levels and permissions within the site.
How to Customize Existing User Roles in WordPress
Method 1: Using plugins
1. Select a User Role Editor Plugin: First, choose a user role editor plugin like “User Role Editor” from the WordPress plugin repository.
2. Install and Activate the Plugin: In your WordPress dashboard, navigate to “Plugins” and click “Add New.” Search for your chosen user role editor plugin, then install and activate it.
3. Access the User Role Editor Interface: Once activated, find the plugin in the WordPress dashboard menu and select the appropriate option to access the user role editor interface.
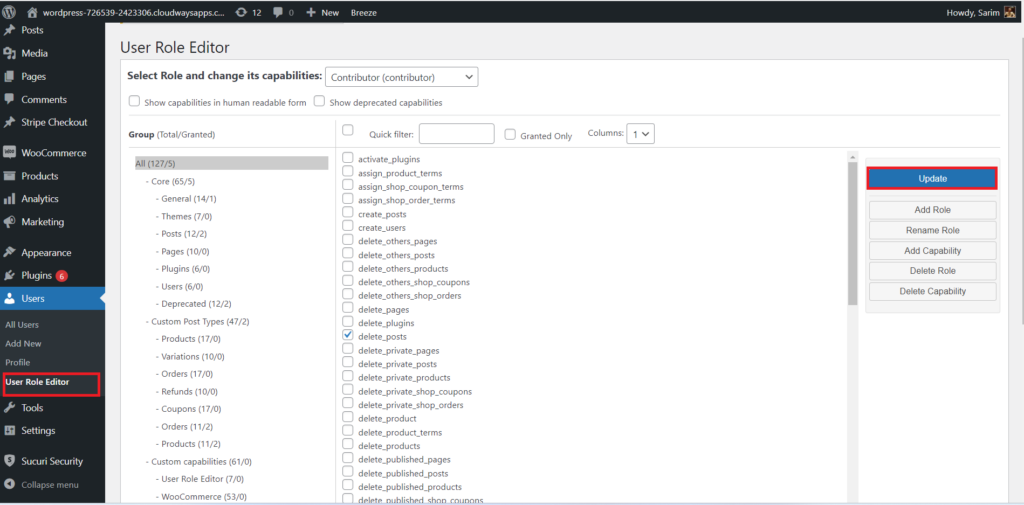
4. Select the Role to Customize: In the user role editor interface, choose the existing user role you wish to customize. This could be any default role like Administrator, Editor, Author, etc.
5. Modify Role Capabilities: The plugin interface will display a list of capabilities associated with the selected user role. You can check or uncheck the boxes next to each capability to grant or revoke access. For instance, enabling or disabling capabilities like editing themes, managing plugins, or deleting posts.
6. Save Changes: After making the necessary adjustments to the role’s capabilities, save the changes within the plugin interface. Some plugins might have specific “Save” or “Update” buttons to apply modifications.
Method 2: Custom code
- Access the Theme’s Functions.php File or Create a Custom Plugin: First, navigate to the theme editor in the WordPress dashboard or use an FTP client to access the theme’s files. Alternatively, create a custom plugin for adding code snippets.
- Use WordPress Functions to Modify Roles: Next, utilize WordPress functions such as
add_cap()to add capabilities orremove_cap()to remove capabilities from existing roles. You can access the functions reference in the WordPress Codex or developer resources. - Define New Capabilities: Customizing roles via code involves defining specific capabilities and assigning them to existing roles. For instance:
// Example: Adding a new capability 'edit_custom_content' to the 'Editor' role

$editor_role = get_role('editor');

$editor_role->add_cap('edit_custom_content');
- Implement Changes Carefully: When modifying roles through custom code, ensure accuracy in syntax and avoid conflicts by testing changes on a staging site or local environment before implementing them on a live site.
Pro tip: Customizing roles offers fine-grained control over user capabilities, tailoring access to match precise requirements. Always make sure to double-check modified capabilities to ensure they align with the intended permissions for the roles without compromising site security.
By following these steps, WordPress administrators can effectively customize existing user roles, adjusting capabilities and permissions to suit specific site requirements or user responsibilities.
How to Delete a User Role in WordPress
Using user role editor plugins
1. Access User Role Editor Interface: Begin by logging in to your WordPress dashboard and navigating to the installed user role editor plugin.
2. Selection of Role for Deletion: Within the plugin interface, locate and select the user role you intend to delete from the list of available roles.
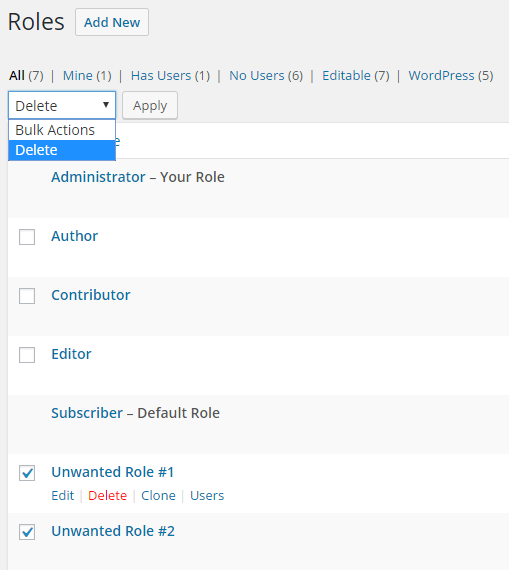
3. Initiate the Deletion Process: Then, look for an option explicitly mentioning deletion or removal associated with the selected user role.
4. Confirm Deletion Prompt: Often, the plugin will prompt a confirmation dialog or ask for verification before proceeding with the deletion. Confirm the action to permanently remove the user role.
5. Review Changes: Once confirmed, the plugin will execute the deletion process. Verify that the role has been successfully removed by checking the list of available roles within the plugin interface.
Using custom code
- Cautionary Measures: Deleting roles through custom code necessitates careful consideration to avoid potential errors or unintended consequences. Always perform this action on a staging or testing environment before implementing it on a live site.
- Utilizing WordPress Functions: In the theme’s functions.php file or within a custom plugin, use the
remove_role()function, specifying the exact role name as a parameter.// Example: Deleting a custom role named 'example_role'
remove_role('example_role');
- Testing and Implementation: After implementing the code snippet, test its functionality on a staging site or local environment to ensure that the deletion process operates as expected without adversely impacting other functionalities.
- Verification: Once confident in its functionality, apply the code on the live site. Verify that the targeted role has been successfully deleted by checking the list of available roles within the WordPress dashboard.
Pro tip: Before deleting any user role, back up your WordPress site to prevent irreversible data loss or accidental removal of critical roles. Deleting roles can impact users associated with those roles. Ensure that users are appropriately reassigned or their access is adjusted to prevent disruption.
Deleting user roles in WordPress demands attention to detail and cautious execution to maintain site integrity and prevent access-related issues for users. By following these steps carefully, administrators can effectively manage user roles without compromising site functionality or security.
How to Create Custom WordPress User Roles
Using plugins
WordPress offers several plugins facilitating the creation and management of custom user roles. Plugins like “Members” or “User Role Editor” provide user-friendly interfaces within the WordPress dashboard.
1. Plugin Installation: Start by installing and activating the desired user role management plugin from the WordPress plugin repository.
2. Accessing Role Editor: Once installed, navigate to the plugin settings within the WordPress dashboard. Locate the “Role Editor” section or similarly named functionality.
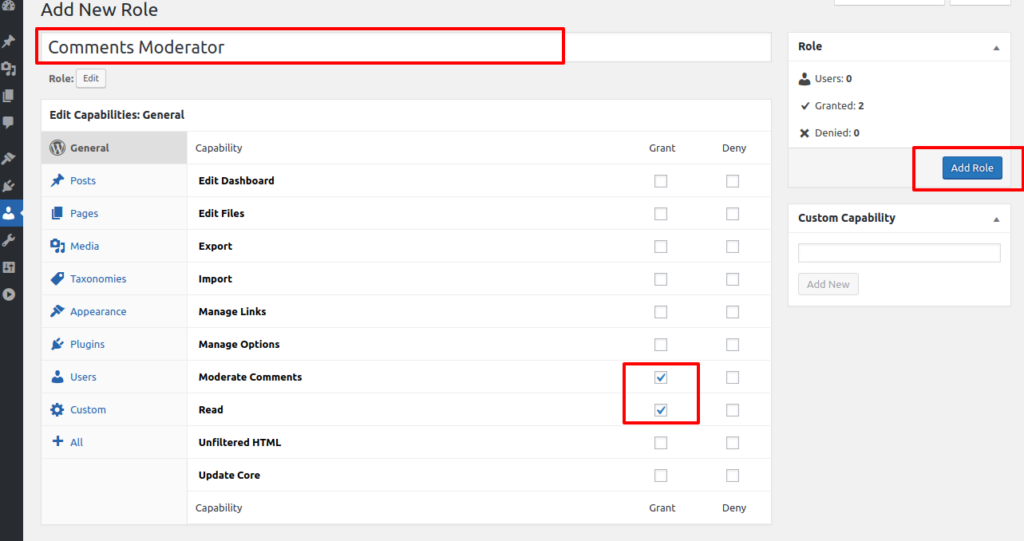
3. Defining New Roles: Within the role editor interface, administrators can define new roles by specifying role names and assigning capabilities. These capabilities range from basic tasks like ‘reading’ to advanced actions like ‘editing themes’.
Using custom code
For advanced users or developers, creating custom roles involves utilizing functions and hooks available in WordPress to define capabilities and assign them to roles programmatically.
- Functions.php or Custom Plugin: Begin by accessing the theme’s functions.php file or create a custom plugin to add code.
- Defining Role Capabilities: Utilize WordPress functions like
add_role()to create new roles andadd_cap()to assign capabilities to these roles. This involves specifying the role’s name, capabilities, and other parameters.
// Example of creating a custom role named 'Content Manager' with specific capabilities

$result = add_role(

'content_manager',

__('Content Manager'),

array(

'edit_posts' => true,

'edit_pages' => true,

'upload_files' => true,

// Add more capabilities as needed

)

);- Assigning Capabilities: Customize the capabilities granted to the custom role according to the site’s requirements. This includes defining access levels to various parts of the site such as editing posts, managing media, or moderating comments.
Both methods offer flexibility in creating custom roles tailored to specific site needs. Plugins provide a user-friendly interface, while custom code offers precise control for developers seeking advanced customization.
How to Manage WordPress User Roles and Capabilities Effectively
Understanding user roles and capabilities in WordPress is essential, but managing them effectively is equally crucial. Employing some fundamental principles can optimize the utilization of WordPress’ user roles and capabilities.
Minimal access allocation
Allocate minimal access to each user based on their specific responsibilities. It’s safer to grant fewer permissions than an excess of them, safeguarding the site and its content from potential risks.
Careful assignment of roles
Assign user roles carefully, adhering to the principle of least privileges. For instance, limit the number of Administrators and Editors, granting only necessary privileges for their designated tasks.
Use the Editor role for content management rather than assigning Administrator privileges. Assign the Author role to trusted content creators with publishing and deletion rights, and utilize Contributor roles for new contributors or guest posts.
Customization of user roles
Customize default roles to meet specific needs. For example, empower Authors with comment moderation capabilities, which aren’t usually part of the default Author role.
Since WordPress allows manual customization of roles using code or plugins, you are given the flexibility to shape roles according to your unique requirements.
Efficient User Management in WordPress Multisite
WordPress Multisite introduces specific settings and options for user management across a network of sites. Understanding and utilizing these functionalities optimizes network administration:
Network registration settings
Configure user registration settings in Multisite to allow or restrict user registrations on the network and subsites. Also, don’t forget to enable options to control user and site creation privileges.
Centralized user access
Benefit from Multisite’s feature, allowing one user account to access multiple sites within the network. This functionality mirrors a unified account experience across the network.
Site-level user registration
By default, Multisite permits user registration for the entire network. However, specific plugins like Network Subsite User Registration enable user registrations limited to individual subsites.
Super Admin privileges
Super Admin privileges should be assigned sparingly and only to trusted users. These privileges allow extended control over the entire network and should be delegated carefully.
To sum up, understanding and effectively managing these settings enhances user role efficiency and streamlines user management across WordPress Multisite installations, ensuring optimized control and access management within the network.
WordPress User Roles Plugins
WordPress offers a variety of user role management plugins to simplify role creation, customization, and management. Let’s take a look at some of the most popular plugins:
1. User Role Editor
Features
User Role Editor offers a comprehensive interface within the WordPress dashboard, allowing administrators to manage user roles, as well as their capabilities efficiently.
Capabilities:
- Intuitive Interface: User-friendly interface for role customization.
- Role Assignment: Assign, edit, or delete user roles effortlessly.
- Capabilities Management: Fine-tune capabilities associated with each role.
Customization Options:
- Role Creation: Create custom roles tailored to specific requirements.
- Permission Management: Modify capabilities per role to align with user responsibilities.
Benefits:
- Ease of Use: Intuitive interface for quick role management.
- Flexibility: Customization options for precise control over roles and permissions.
- Compatibility: Works seamlessly with various WordPress themes and plugins.
2. Members
Features
The Members plugin provides advanced control over user roles and capabilities, empowering administrators to both define and manage roles effectively.
Capabilities:
- Role Control: Manage default roles and create custom roles.
- Capabilities Assignment: Assign or revoke specific capabilities for each role.
- Content Permissions: Restrict or grant access to content based on user roles.
Customization Options:
- Role Customization: Create, edit, or delete roles effortlessly.
- Role-based Access: Control access to pages, posts, or custom post types.
Benefits:
- Robust Functionality: Offers extensive control over roles and access.
- Content Restriction: Restrict content visibility based on user roles.
- Compatibility: Compatible with popular WordPress plugins and themes.
3. PublishPress Capabilities
Features
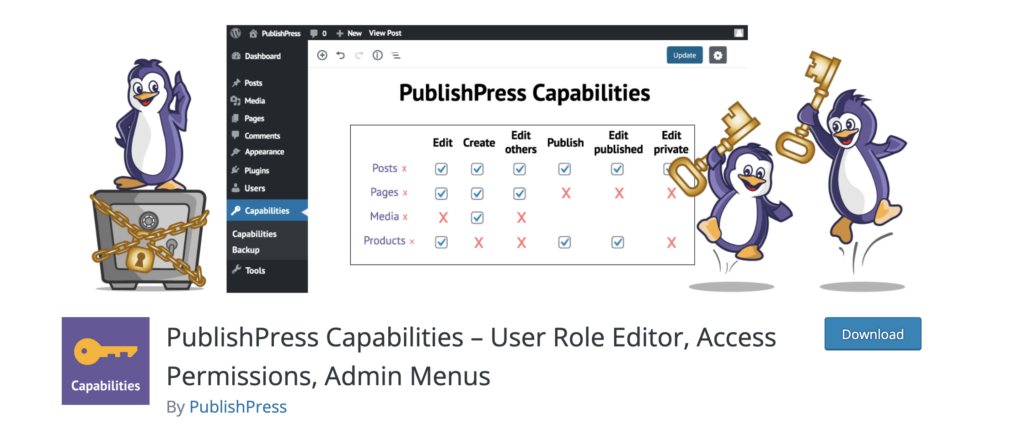
PublishPress Capabilities focuses on fine-tuning user capabilities, allowing administrators to manage capabilities across user roles as efficiently as possible.
Capabilities
- Capability Management: Grant, modify, or revoke capabilities for roles.
- Role Editor: Edit default roles or create custom roles as per requirements.
Customization Options:
- Granular Control: Adjust capabilities with precision for each role.
- Capability Creation: Create custom capabilities for specific user tasks.
Benefits:
- Granular Control: Offers fine-grained control over user capabilities.
- Role Customization: Modify default roles or create new roles seamlessly.
- User-specific Permissions: Customize capabilities for individual roles.
4. WPFront User Role Editor
Features
WPFront User Role Editor provides a simplified interface for managing user roles and capabilities, catering to both novice and experienced users.
Capabilities:
- Role Management: Edit, create, or delete user roles effortlessly.
- Capability Assignment: Assign or modify capabilities for each role.
Customization Options:
- Role Creation: Generate custom roles tailored to specific needs.
- Capability Adjustment: Fine-tune capabilities for precise access control.
Benefits:
- User-friendly Interface: Easy-to-use interface for quick role management.
- Role Customization: Customize roles and capabilities without complexities.
- Compatibility: Compatible with various WordPress themes and plugins.
These plugins offer diverse functionalities to manage user roles, capabilities, and access permissions in WordPress. Administrators can choose based on their specific requirements, preferences for interface usability, as well as desired level of customization.
Unleashing WordPress Potential: Amelia Redefines Appointment Management
Amelia isn’t just a plugin; it’s a game-changer for WordPress sites! Imagine effortlessly managing appointments, events, and consultations with a tool that seamlessly integrates into your WordPress ecosystem.
This powerhouse booking plugin brings a world of features to your fingertips, such as:
- Intuitive Interface: Say goodbye to complexity! Amelia’s user-friendly interface makes appointment management a delight.
- Customizable Forms: Tailor booking forms to your liking, offering a personalized experience to your clients.
- Automated Reminders: Keep everyone in the loop with automated reminders, reducing no-shows and last-minute cancellations.
- Synced Calendars: Sync appointments across calendars for streamlined scheduling and better organization.
- Secure Payments: Seamless integration with secure payment gateways for hassle-free transactions.
Elevate your site’s functionality; embrace Amelia for a comprehensive solution to your appointment booking needs within WordPress!
Final Thoughts on WordPress User Roles
Effective management of user roles and capabilities is imperative for maintaining a secure and structured WordPress site. By adhering to best practices and utilizing appropriate tools, administrators can ensure streamlined user ecosystems across both single-site installations and WordPress Multisite networks.
Key takeaways:
- Strategic Role Allocation: Make sure to assign minimal access required for each user role to prevent unnecessary privileges.
- Role Customization: Leverage plugins or custom code to create, modify, or delete user roles tailored to specific site needs.
- Multisite Management: Understand the nuances of WordPress Multisite user management for centralized control over networked sites.
- Plugin Assistance: Utilize user role management plugins to simplify and expedite role-related tasks without extensive coding knowledge.
By embracing these principles and employing robust user role management strategies, WordPress administrators can foster a secure, efficient, and well-organized environment. This will ensure optimal functionality as well as user experience across their WordPress sites.
Looking for More WordPress Guides and Tutorials?
Make sure to check out these valuable resources to enhance your WordPress journey:
- How to Reset Your WordPress Site: An In-Depth Guide
- How to Install WordPress: A Beginner’s Guide
- How to Delete a WordPress Site: A Step-By-Step Guide
- The Best Local WordPress Development Environments in 2023
- How to Back Up Your WordPress Site: The Ultimate Guide
- Discover 10 Best Plugins for WordPress in 2023 (Expert Picks)
- Is WordPress Free? Demystifying WordPress Pricing

